UVIEW 331500A Spotgun Jr Injection System with ExtenDye Instructions
- June 9, 2024
- UVIEW
Table of Contents
UVIEW 331500A Spotgun Jr Injection System with ExtenDye
Product Information
The product consists of True-UV LED lights and a Spotgun Jr. Injection System. True-UV LED lights emit ultraviolet (UV) light that can be harmful to health. The Spotgun Jr. Injection System is an injection gun that injects dye into the A/C system without the need to evacuate any refrigerant.
True-UV LED Lights
The True-UV LED lights emit intense ultraviolet (UV) light when operated. Most of the UV light emitted is not visible. Exposure to UV radiation can be harmful to health. Always use appropriate eye protection (UV blocking glasses) when operating the light. Protect eyes and skin during operation. Do not look directly at the light during operation. Exposure to UV light, even for a brief period can damage your eyes.
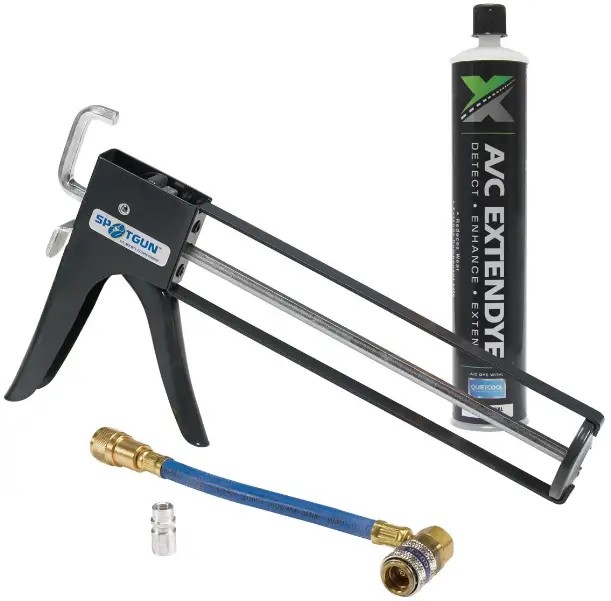
Spotgun Jr. Injection System
The Spotgun Jr. Injection System is the world’s most popular injection method. It consists of a disposable cartridge, an injection gun, an adapter, and a drip cap. The injection gun injects the dye into the A/C system without the need to evacuate any refrigerant. The product comes with technical support and can be set up using the instructions provided.
Product Usage Instructions
Set-up Injection Gun System
- Hold the disposable cartridge in an upright position then remove cap and seal from cartridge.
- Attach hose (R-134a) to the top of the disposable cartridge then remove drip cap from adapter. (Fig. 1)
- Push the release lever on the injection gun with your thumb, and pull the rod all the way back. (Fig. 2)
- Install cartridge into gun assembly. (Fig. 3)
- Squeeze trigger until piston seats in disposable cartridge.
Operation (R-134a)
- Connect injection gun system to the low side port of the A/C system.
- Inject dye into the A/C system by squeezing the trigger (Fig. 4). See Dye Dose Chart below.
- Disconnect injection gun system from the A/C port.
- Attach drip cap to the adapter.
- Install Dye Service Sticker in a visible location under the hood.
- Start the engine and turn on the A/C to maximum for a few minutes. This is to circulate the fluorescent dye in the system.
- Turn the engine OFF. Check for leaks using an ultraviolet lamp. Possible leak areas will glow a bright yellow/green when exposed to UV light.
- Note: Smaller leaks may require longer circulation time. Let the A/C system run for a few days then reinspect.
R-12 Set-up
- Complete all steps in the Set-up procedure.
- Remove the R-12 adapter drip cap and attach it to the low side port of the A/C system.
- Attach the injection gun system to the R-12 adapter valve.
- Repeat steps 2-7 in the Operation procedure above. (As applicable).
Leak Detection Light Instructions
The Leak Detection Light is a replacement part and usage instructions are not provided in this manual.
MODELS

Operating Instructions
IMPORTANT!
Studies have proven that the use of UV Enhancing Glasses (supplied) allow the
user to find and spot leaks easier and faster. For more information on this
subject visit www.cpsproducts.com
- Put on UV Enhancing Glasses (supplied).
- Turn on lamp by depressing switch on rear of lamp.
- Scan the area with the UV lamp.
- Adjust focus/intensity by turning head on the lamp.
A fluorescent glow will appear from leaks. For optimum results do not use a
lamp in bright sunlight and make sure to wear the UV Enhancing Glasses as they
will allow you to see the fluorescent glow of the dye more.
Replacement Part
98006475 – UV Phazer BLACK lamp
SET UP INJECTION GUN SYSTEM
- Hold the disposable cartridge in an upright position then remove cap and seal from cartridge.
- Attach hose (R-134a) to the top of the disposable cartridge then remove drip cap from adapter. (Fig. 1)
- Push the release lever on the injection gun with your thumb, and pull the rod all the way back. (Fig. 2)
- Install the cartridge into the gun assembly. (Fig. 3)

- Squeeze trigger until piston seats in disposable cartridge.
Now the Injection gun system is ready to be used.
OPERATION (R-134a)
The Injection gun injects the dye into the A/C system without the need to
evacuate any refrigerant. To use, proceed with the following steps:
- Connect injection gun system to the low side port of the A/C system.
- Inject dye into the A/C system by squeezing the trigger (Fig. 4). See “Dye Dose Chart” below.

- Disconnect injection gun system from the A/C port.
- Attach drip cap to the adapter.
- Install “Dye Service Sticker” in a visible location under the hood.
- Start the engine and turn on the A/C to maximum for a few minutes. This is to circulate the fluorescent dye in the system.
- Turn the engine “OFF”. Check for leaks using an ultraviolet lamp. Possible leak areas will glow a bright yellow/green when exposed to UV light.
- Note: Smaller leaks may require longer circulation time.
- Let the A/C system run for a few days then reinspect.
R-12 SET-UP
- Complete all steps in SET-UP procedure.
- Remove R-12 adapter drip cap and attach to low side port of the A/C system.
- Attach injection gun system to the R-12 adapter valve.
- Repeat steps from 2-7 in the OPERATION procedure above. (As applicable).
True-UV LED Lights
CAUTION!
- EMITS ULTRAVIOLET RADIATION! This light radiates intense ultraviolet (UV) light when operated. Most of the UV light emitted is not visible. Exposure to UV radiation can be harmful to your health.
- ALWAYS USE APPROPRIATE EYE PROTECTION (UV-BLOCKING GLASSES) WHEN OPERATING LIGHT.
- Protect eyes and skin during operation.
- Do not look directly at the light during operation. Exposure to UV light, even for a brief period can damage your eyes
- TECHNICAL SUPPORT: 1800-277-3808
- 3600 Enterprise Way, Miramar, FL 33025 U.S.A.
- Toll Free 1800-277-3808 ï Fax: 305-687-3743
- Printed in USAWWW.CPSPRODUCTS.COM
Read User Manual Online (PDF format)
Read User Manual Online (PDF format) >>