LUMINES CLARO Series Linear LED Luminaire Instruction Manual
- June 10, 2024
- LUMINES
Table of Contents
LUMINES CLARO Series Linear LED Luminaire
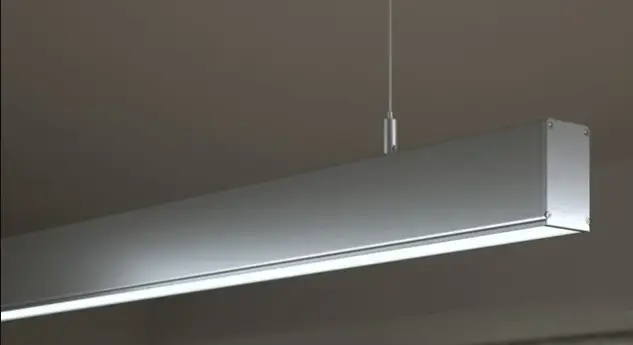
Use
Integrated luminaires LUMINES are ideal for arranging in any interior. Reliable SAMSUNG LEDs in combination with perfectly matched LUMINES LED profiles create timeless linear lighting that can be used both for main and decorative lighting inside the building.
Warning
Installation should be performed by a person with appropriate qualifications.
Stay careful during the installation process.
All actions related to repair, maintenance or adjustment should be carried out
with the disconnected power (the power supply should be disconnected at least
10 minutes before the planned works).
The light source of this luminaire is not replaceable; when the light source
is worn out, the entire lighting fitting must be replaced.
Caution! This product is not a toy! To avoid the danger of suffocation keep
the bag and the product away from the babies and children!
The assembly of this product should be carried out in accordance with the
presented diagram – drawing.
The lighting fixture should not be installed in the nearness of flammable
materials. It is forbidden to interfere with the lighting fixture and to make
any technical modifications to the fixture. Any changes involve the risk of
transferring full responsibility to the person making the changes.
Failure to follow the instructions may result in burns, fire, electric shock,
personal injury, or material and non-material damage.
The power cord of the lighting fixture cannot be replaced.
The lighting fixture must not be used or stored in a corrosive environment.
The device made in “Class I” protection must be connected to the grounding
installation (3-wire installation).
The following wires are used in LUMINES lighting fixtures:
- OMY cable 3×0.75
- H05V-U cable
The warranty does not cover
Defects caused by installing the device contrary to the instructions.
Defects and damage resulting from natural wear and contrary to the intended
use.
As a result of mechanical damage and as a result of overvoltage’s from the
mains.
Maintenance
The lighting fitting should be cleaned with a clean, dry and soft cloth. Do not use caustic agents or solvents.
| **Useful luminous flux*| Color temperature| Beam angle| Type
of power supply| Lifespan| Power| CRI| UGR 4h
8h| On/Off time| PF| IP rating| Weight|
Dimensions**
---|---|---|---|---|---|---|---|---|---|---|---|---|---
CLARO 60| WHITE| 2680 lm| 4000 K| 100°| 220-240 V AC
50-60 Hz| 54000 h| 27 W| >80 CRI| 28,8| 25000| >0,9| IP20| 1,4 kg| 613×43×73
mm
SILVER| 2430 lm| 3900 K| 100°| 220-240 V AC
50-60 Hz| 54000 h| 27 W| >80 CRI| 28,7| 25000| >0,9| IP20| 1,4 kg| 613×43×73
mm
CLARO 120| WHITE| 5400 lm| 4000 K| 100°| 220-240 V AC
50-60 Hz| 54000 h| 54 W| >80 CRI| 28,9| 25000| >0,9| IP20| 2,1 kg| 1213×43×73
mm
SILVER| 4920 lm| 3900 K| 100°| 220-240 V AC
50-60 Hz| 54000 h| 54 W| >80 CRI| 28,8| 25000| >0,9| IP20| 2,1 kg| 1213×43×73
mm
CLARO 180| WHITE| 8100 lm| 4000 K| 100°| 220 240 V AC 50-60 Hz| 54000 h| 80 W|
80 CRI| 28,9| 25000| >0,9| IP20| 2,9 kg| 1813×43×73 mm
SILVER| 7980 lm| 3900 K| 100°| 220-240 V AC
50-60 Hz| 54000 h| 80 W| >80 CRI| 28,8| 25000| >0,9| IP20| 2,9 kg| 1813×43×73 mm
Replace any broken protective screen.
The lamp is not dimmable
Do not look at the working light source for a long timE
The minimum distance from the illuminated object is 0.5 m
Warning: risk of electric shock
Requires grounding.
 Do not cover luminaire
with thermal insulation materials.
Do not cover luminaire
with thermal insulation materials.
Note! It is forbidden to assembly the lamp under voltage.
The product meets the requirements of Regulation 2012/19/UE.
The symbol of the crossed out trash can on the device means that the product
marked with it may not be thrown out with other household waste. After use,
the product should be taken to a collection point for waste electrical and
electronic equipment or returned to the retailer. Appropriate segregation of
the material for later treatment, recovery or destruction helps to avoid
negative effects on the environment and health, and enables the recovery of
raw materials from which the product was made.
For details on available collection points, please contact your local
sanitation service or the store where you purchased the product.

IN THE PACKAGE
-
LED lamp

-
Lifts
-
Nipple
-
Screws
-
Holders
-
Headliner
NECESSARY TOOLS

ASSEMBLY INSTRUCTIONS
LET’S START
-
On the ceiling, mark the place to assemble the headliner, drill the holes and then assemble the flanges for the mounting pins in them.

-
Screw the assembly bracket in place of the holes with screws.
-
Attach rope locks to the protruding screws on the back of the profile

-
Attach the cube to the wires protruding from the ceiling (L – phase, N – neutral, PE – protective)

NOTE!
Risk of electric shock! Before assembly, make sure that the power is disconnected and the cables are de-energized! -
Put the headliner on the assembly element so that the screws with washers protrude outside and gently turn them, then tighten the screws.
-
Screw the ceiling mount at a distance X from the middle of the headliner.
-
Put the rope with the ball through the nipple and screw it into the ceiling holder.
-
Insert the cables into the locks located on the back of the profile and set them to the appropriate width and then adjust them to the appropriate height.

-
Level the lamp
-
Cut off any excess lines

Thank you for choosing the CLARO LED luminaire Dziękujemy za wybór oprawy LED
CLARO Vielen Dank, dass Sie sich für die CLARO LED-Leuchte entschieden haben
Made in Poland:
LED Labs Sp. z o.o.
Zakopiańska 2C
30-418 Kraków, Poland
www.lumines.pl

The costs of waste management can be found:
www.led-labs.pl

References
Read User Manual Online (PDF format)
Read User Manual Online (PDF format) >>