icuserver ICU800 Wireless Trail Camera Instruction Manual
- June 5, 2024
- icuserver
Table of Contents

Instruction Manual
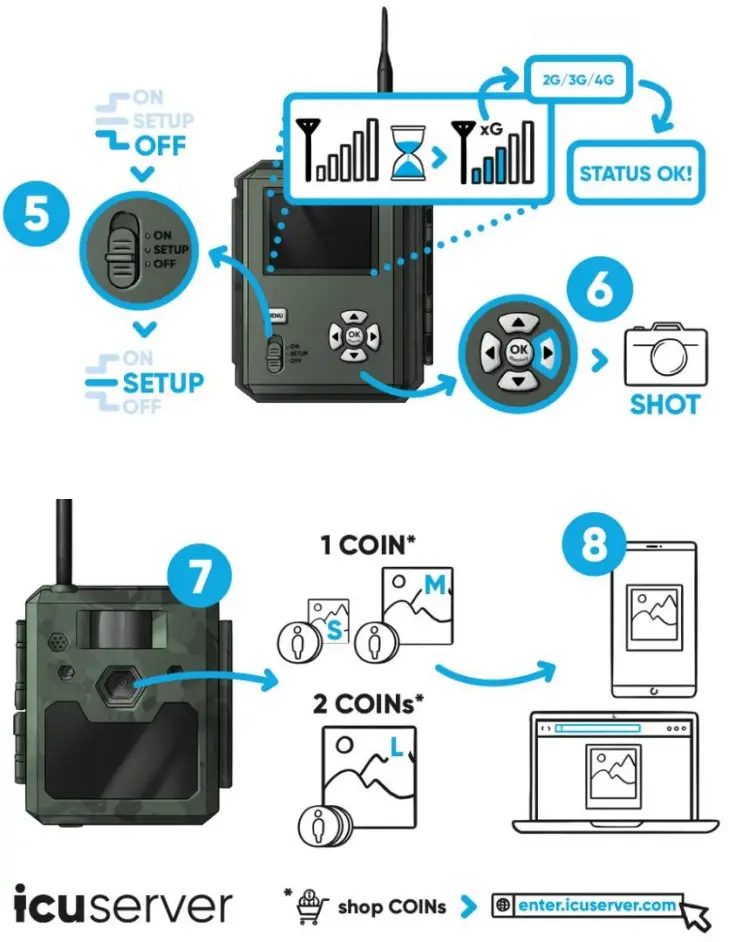
| SETUP1/2 Registration | SETUP 2/2 Test photo |
|---|
 |
|
User Manual
Package Contents
Camera, SIM card (pre-inserted), user manual, USB cable, mounting strap, antenna

Power supply
Internal supply
The camera can be operated using either AA batteries or 18650 lithium-ion
rechargeable batteries.
!!IMPORTANT!! The type of batteries being used must be entered in the
“Settings” section of the camera menu. Failure to do so can significantly
decrease battery performance.
AA batteries
Alkali batteries or lithium batteries can be used. We recommend operating the
camera with lithium batteries. They typically provide sufficient voltage even
at low temperatures. AA rechargeable batteries
AA rechargeable batteries provide lower voltage at very low temperatures and
are not recommended for cameras with 8 AA batteries.
18650 – lithium-ion rechargeable batteries
When using 18650 rechargeable batteries, it is ESSENTIAL that you enter the
type of battery in the “Settings” section of the camera menu. Failure to do so
can significantly decrease battery performance.
External power supply
Use only our ICUserver products as an external power source
(shop.icuserver.com)). The use of other power
sources can invalidate the guarantee. We recommend removing the batteries when
an external power source is used.
Important note
- To prevent the deletion of all system data, turn your camera OFF before changing the batteries or SD card or when plugging in or unplugging the external power supply.
- After a RESET the camera must be restarted (turn off and on).
- Please note that setting a higher image quality for sent images (Menu: “Mobile” – “Image send size”) will cause more of your COINS to be used.
- Avoid switching immediately from “ON” to “SETUP”.
- Ensure that you insert the batteries with the correct polarity (-/+).
- If the camera will not be used for an extended period of time, remove the batteries to prevent them from leaking.
- An external 12V / 1 – 2A DC mains adapter with a suitable plug can be used instead of batteries. Ensure that this has the correct voltage. We recommend removing the batteries when a mains adapter is used.
- Do not immerse the camera in water or expose it too acidic or basic environments.
- Avoid placing pressure on or touching the PIR motion sensor.
- Always keep the camera clean, particularly the lens and battery compartment.
- Objects such as leaves, cords, or ties within the scope of the motion sensor can unintentionally trigger photos/videos.
- To avoid unwanted photos or videos, do not point the camera at hot objects, air conditioning units, air vents, the surface of the water, or light.
The ICUserver COIN system Image sending
Payment for image sending is made via COINs. You automatically receive 100
COINs with the purchase of the camera. For each S-image or M-image that is
sent, one COIN will be subtracted from your inventory. Please note that
setting a higher image quality for sent images will use a greater quantity of
COINS. In case of poor mobile data reception, we recommend the setting “S
image”. You can check your COINs inventory in your personal customer account.
COINs can be purchased from the shop https://entericuserver.cornishoix
Initial start-up
Insert SD card
The camera can accept SD cards with a capacity of up to 32 GB. Before you
insert or remove the memory card, the camera must be turned off (ON/OFF switch
to “OFF”).
Mount the antenna
Screw the antenna into place securely but without force.
The camera has 3 operating modes
OFF mode — the camera is turned off; it can be connected to another oc.,
vice (computer or laptop) via a USB port.
ON mode — the camera automatically takes photos/videos (according to the
current parameter settings) when the passive IR sensor detects motion and
triggers the camera. SETUP mode – the camera settings can be changed and
the images and videos saved to the camera’s SD card can be viewed.
Capture and playback of photos and videos
- In setup mode, you can switch between photo and video mode using▲
- Select “▶” to begin or end image/video capture.
- Press “OK” in setup mode to access playback mode, then “▲” or “▼” to scroll through the photos/videos. You can view videos with “▶” and stop playback with “▶” followed by “▲”.
- Exit playback mode by pressing “OK” once again.
The screen display in setup mode
 |
Camera mode
|
Camera mode
Image size
Signal strength
Number of images
Video mode
Audio recording
Video resolution
Video length
Time stamp on
Time-lapse on
Battery charge level
SD card status
Photo and video mode can only be set via the menu
---|---
Deleting videos/photos
Press “M” in playback mode to delete individual photos or all photos. Then
press “M” again to exit. Camera setup Press “M” from setup mode to
enter the operational menu. Navigate through the settings using “◀”, “▲”, “▶”,
or “▼”. Confirm changes with “OK”. With “M” you can return to the menu without
saving the changes.
USB connection
When the camera is connected to your computer using a USB cable, the
memory card will be visible in your computer’s file explorer. CAMERA
Name| The camera name can be set or changed here. The name is used to
identify the camera and is displayed on the photos.
---|---
Mode| Photo (= standard) The camera takes photos based on the
capture number and image resolution settings. Video: The camera films a video
based on the video length and resolution settings.
Photo & video: When triggered, the camera first takes a photo, then films a
video based on the capture number, video length, and resolution settings.
Image resolution| SMP (2560’1920) (= standard),
8 MP (3264’2448),12 MP (40001‘3000)
Night quality| Max. quality: Short exposure time to improve image
quality by minimizing blurriness caused by movement, but reduced IR flash
range.
Balanced (= standard): Combination of max. quality and max. range.
Max. range: Longer exposure time to increase the IR flash range for better
night vision, but lower image quality.
Capture number| 1 (= standard) can be set for up to 9 images per
trigger. The first image in a series will be sent.
Video resolution| FHD: 1920’1080 (= standard), HD: 1280′1720, VGA:
6401‘360
Video length| 5 – 60 seconds; standard 10 seconds
SENSOR
Sensor ON/OFF| On (= standard) The camera is triggered by movement.
Off: The camera is not triggered by movement.
---|---
Sensitivity| Auto (= standard) / Low / Normal / High
Higher sensitivity means that the sensor reacts more sensitively to the movement of smaller objects; greater capture distance; the sensor can better distinguish between body heat and outdoor temperatures and the camera is triggered more easily. With the “auto” setting, the sensor automatically adjusts to the outdoor temperature.
Work time| If no work time is set (off = standard), the camera will
always be triggered when in active mode.
If a work time is set (on), the camera will only be triggered during the
timeframe specified in the camera settings. The work time can be set by
confirming “on” with the “OK” button. You can change the settings using the
UP/DOWN buttons. Use the LEFT/RIGHT buttons to switch to the next field to set
the desired timeframe. If a work time is set, the camera will only be
triggered during the timeframe specified in the camera settings.
Trigger interval| Determines the length of time between two photos
being taken (incl. sending time), from 1 second to 60 minutes (standard 10
seconds). Note: please do not set the time-lapse and trigger interval to
“ON” at the same time.
Time-lapse| Off (= standard)
On: Change the setting to “ON” and press “OK” to set the interval. Two
periods of time (A and B) can be configured; please ensure that they do not
overlap.
When time-lapse is set the camera’s PIR sensor will be turned off. The
camera will automatically capture photos or videos in accordance with the time
periods A and B as well as the interval (standard 5 minutes) set by
the user. Configurable interval:1minute to 24 hours
MOBILE
Image send size| S image: Small image size: 640 x 480 – 80 kb -> 1 COIN
M image: Medium image size:1.024 x 768 -80 kb -> 1 COIN L image: Max.
quality:1.280 x 960 -150 kb-> 2 COINs
Max. images/ day| Unlimited (= standard): There is no limit on the
number of sent images. You can optionally set the limit to 1 to 99 images
per day. All images taken are always saved to the SD card.
SETTINGS
Language| English (=Standard), German, Spanish, Italian, French,
Russian, Dutch, Swedish, Polish
Batteries| Set M batteries (= standard) or 18650 batteries, depending on
which batteries are inserted in the camera.
Date/ time| Hour: minute, day-month-year
Note: if the date is set incorrectly, this can affect other camera settings.
Password| Off (= standard): No password protection
On: Change the setting to “ON” and press “OK” to create a password (4-digit
numerical code) for the camera. Note: for security reasons, a forgotten
password can only be deleted with a firmware flash reset.
SD card infinite| Off (= standard) When the SD card is full, no
further images can be saved or sent
On: Change the setting to “ON” and press “OK” to have the camera delete the
oldest photos and videos to continue taking pictures when the SD card is full.
Image format| 4:3 (= standard) or 16:9
Formatting the SD card| To format the SD card, confirm “Execute” and
“Yes” by pressing “OK”. All images and videos on the SD card will be
permanently deleted.
Timestamp| Set whether the time should be displayed on the image (on =
standard) or not (off).
Reset camera| To reset all camera settings to the original factory
settings, confirm “Execute” and “Yes” by pressing “OK”. The camera must then
be turned off and on again.
---|---
Version| Display the camera’s firmware version and IMEI
Changing settings remotely (mobile phone, computer)
PREMIUM customers can unilaterally change camera settings remotely using ”
CAMERAS -> Control -> CAMERA”.
Technical specifications
Lens| f – 7.36 mm F/NO: 2.8 FOV – 490; Auto IR-cut removal (nights); supports
microlenses: 450 mm, CMOS: 5 MP
---|---
Exposure time| <0.25S
SD card| Max. 32kB
Mode| Photo, video, dual
Image resolution / format| 5 MP, 8 MR 12 MP / 4:3,169
Number of images| 1-9
Video resolution / length| 640 x 360,1280 x720,19201080 / 5 s – 60s
(-amen] name| FREELY SELELTAttsLE
Trigger interval| 1 s – 60 m
Timestamp| ON/OFF
Work time| ON/OFF
Luilyouye| Spanish, French, Russia, Dutch, Swedish, Polish
Operating temperature| -20°C – 60°C
www.icuserver.co Caution:
This device complies with Part 15 of the FCC rules and Industry Canada
license-exempt RSS standard(s). Operation is subject to the following two
conditions: (1) this device may not cause harmful interference, and (2) this
device must accept any interference received, including interference that may
cause undesired operation.
The manufacturer is not responsible for any radio or TV interference caused by
unauthorized modifications or changes to this equipment. Such modifications or
changes could void the user’s authority to operate the equipment. This radio
transmitter (identify the device by certification number or model number if
Category II) has been approved by Industry Canada to operate with the antenna
types listed below with the maximum permissible gain indicated. Antenna types
not included in this list, having a gain greater than the maximum gain
indicated for that type, are strictly prohibited for use with this device.
This equipment has been tested and found to comply with the limits for a Class
B digital device, pursuant to part 15 of the FCC Rules. These limits are
designed to provide reasonable protection against harmful interference in a
residential installation. This equipment generates, uses, and can radiate
radio frequency energy and, if not installed and used in accordance with the
instructions, may cause harmful interference to radio communications. However,
there is no guarantee that interference will not occur in a particular
installation. If this equipment does cause harmful interference to radio or
television reception, which can be determined by turning the equipment off and
on, the user is encouraged to try to correct the interference by one or more
of the following measures:
- Reorient or relocate the receiving antenna.
- Increase the separation between the equipment and receiver.
- Connect the equipment into an outlet on a circuit different from that to which the receiver is connected.
- Consult the dealer or an experienced radio/TV technician for help.
The device has been evaluated to meet general RF exposure requirements.
To maintain compliance with FCC’s RF exposure guidelines, this equipment should be installed and operated with a minimum distance of 20cm between the radiator and your body.
References
Read User Manual Online (PDF format)
Read User Manual Online (PDF format) >>