Eleven Engineering Incorporated PL5572-R2003 Rush Receiver for Analog Audio User Guide
- May 15, 2024
- Eleven Engineering Incorporated
Table of Contents
- Eleven Engineering Incorporated PL5572-R2003 Rush Receiver for Analog
- Product Information
- Product Usage Instructions
- Specification
- Overview Description
- PRODUCT DIMENSIONS
- RECEIVER USER’S GUIDE
- QUESTIONS AND ANSWERS
- FCC Statement
- IC Warning
- Contact Information
- Read User Manual Online (PDF format)
- Download This Manual (PDF format)
Eleven Engineering Incorporated PL5572-R2003 Rush Receiver for Analog
Audio

Product Information
Specifications
- Model: PL5572-R2003
- Works With: Devices with a 3.5 mm analog input (AUX IN) supporting analog audio
- SKAA Signal Latency: SKAA (36ms) and SKAA Pro (19ms)
Product Usage Instructions
-
Volume Adjustment
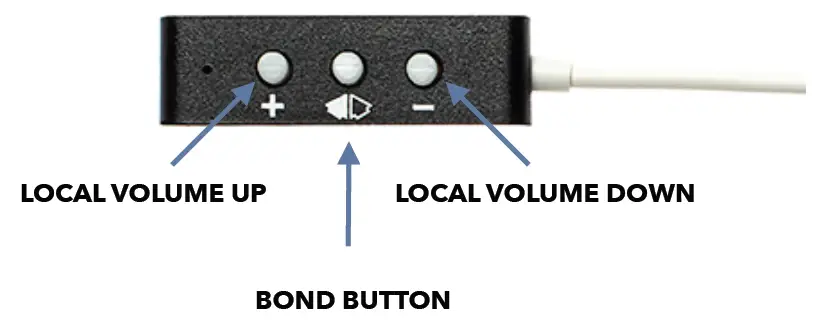
Adjust the local volume using the + and – buttons on the receiver. -
Green List and Indicator
The Green List stores favourite audio sources (SKAA transmitters). A green glowing indicator signifies listening to a favorite or searching for one. An amber indicator indicates exploring for new transmitters. -
Bonding with Transmitter
To bond with a specific Green transmitter, play audio from your source device with a connected SKAA transmitter. Click the Bond Button on the receiver. The receiver will hunt through the Green List, flashing the Indicator until it bonds with the desired transmitter. -
More Commands
Additional commands can be executed by clicking the Essentials Button multiple times. These commands include muting, unmuting, and factory reset. -
Cluster of Receivers
To create a cluster of receivers, follow the outlined steps in the manual. This allows synchronized operation of multiple receivers within proximity.
FAQ
Questions and Answers
-
How does the Green List work?
The Green List stores favourite audio sources (SKAA transmitters) for easy access and selection. -
How do I bond with a specific Green transmitter?
To bond with a specific Green transmitter, play audio from your source device with a connected SKAA transmitter and click the Bond Button on the receiver until it bonds with the desired transmitter.
Specification
|
---|---
Works With| Devices with a 3.5 mm analog input (sometimes referred to as
an AUX IN)
Requirements| The device must support analog audio in
Notes| See the “SKAA Receivers Users Guide” on pages 3 and 4 of this
document for instructions on how to use the Bond Button.
| Rush is capable of receiving both SKAA (36ms latency) and SKAA Pro (19ms
Latency) signals from SKAA transmitters.
| Adjust the local volume by using the + and – buttons shown below
Overview Description
PRODUCT DIMENSIONS

RECEIVER USER’S GUIDE
Each SKAA receiver uses a Green List to remember your favourite audio sources (SKAA transmitters). A Green glowing Indicator on your receiver means you are listening to a favourite, or hunting for one. You can also explore to find new transmitters—an Amber Indicator means you are exploring for transmitters that are not on your Green List. The Bond Button on your receiver lets you select which audio source (SKAA transmitter) you’re listening to.
Essentials

More Commands

QUESTIONS AND ANSWERS
Question
|
Answer
---|---
How does the Green List work?| You can store up to 10 SKAA transmitters on
your Green List. These are your “favourite” audio sources. Every time you add
a transmitter, it is assigned the first open spot on the Green List. When you
single click the Bond Button, the receiver hunts through the Green List much
like a car radio hunts for radio stations when you press seek. If the
Indicator is dim Green and flashes every few seconds, this tells you the
receiver is hunting through the Green List. Say you have 5 transmitters on
your Green List; your receiver will hunt through the list one by one: 1, 2, 3,
4, 5 and then back to 1 and so on. The dim Green Indicator flashes every time
the receiver moves to the next spot on the list. This hunting goes on for up
to 1 minute. If your receiver doesn’t find any of your favourite transmitters,
it stops hunting and just waits for the last bonded favourite. If your
receiver does find one of your favourite transmitters, the hunting stops, the
Indicator turns bright green, and your receiver starts playing audio from that
favourite. A dim Green Indicator that is NOT flashing means the receiver is
just sitting on one spot, waiting for a specific favourite transmitter to show
up.
How do I bond with a specific Green transmitter?| Play audio from your source
device and ensure it has an SKAA transmitter connected. Click the Bond Button
on your receiver. The receiver hunts through the Green List, flashing the
Indicator as it
goes. Once your receiver finds one of your favourite transmitters, it bonds to it and plays audio from that transmitter. If that isn’t the transmitter you wanted, click the Bond Button once more. Repeat until your receiver bonds with the transmitter you want and you’re hearing the correct audio playing.
How do I select transmitters if I can’t reach my Bond Button?| Say you want to
put your receiver on a high shelf where you can’t reach the Bond Button
easily. First, set up your Green List: add all of the transmitters you’ll want
to use. Then 4-click the Bond Button to enter Red Mode. Now put the receiver
up on the high shelf. Power on just one of your transmitters and power off all
others. The receiver automatically bonds to the transmitter that’s on.
How do I delete a transmitter from my Green List?| Factory Reset (6 Clicks of
the Bond Button) clears the Green List and lets you start over from scratch.
If however, you’d like to delete just one transmitter from your Green List,
first bond your receiver to the transmitter you wish to delete. See the
section above: How do I bond with a specific Green transmitter? Once you
are bonded to it, hold down the Bond Button for a few seconds until you see
the Indicator flash Red —this Red flash means the transmitter has been
deleted.
What is a Cluster?| Clusters are an optional convenience for “power users”. A
Cluster is several SKAA receivers behaving as one product. A left & right
speaker pair, for example, or a sound bar and subwoofer.
What is the Master receiver?| In any Cluster, there is a single Master
receiver, and all of the other receivers in the Cluster follow its behaviour.
You can control the entire Cluster by operating the Bond Button of the Master.
A receiver must have a physical Bond Button to become the Master.
How do I “uncluster” several receivers?| Do the Make a Cluster of Receivers
procedure once for each receiver, but omit Step 3. Do them one at a time. This
gives each of the receivers a functioning Bond Button and each of them will
thereafter operate independently.
What are some tips for making Clusters?| Each step in the Make a Cluster of
Receivers procedure has a 10-second time limit. When you see the Master’s
Indicator start to flash Red, you have 10 seconds to power on the next
receiver. When that receiver’s Indicator starts to flash Red, you have 10 more
seconds to power on the next one, and so on.
Why does only one of my Bond Buttons work?| When you make a Cluster from
several receivers, the first one powered on in the Make a Cluster of Receivers
procedure becomes the Master of the Cluster. Only the Master’s Bond Button
works because a Cluster uses just one Green List —the Master’s Green List. The
Bond Button of each of the other receivers will work only for the Mute/Unmute
function (3-Click of the Bond Button).
Can any group of receivers be made into a Cluster?| No. The receivers must be
members of the same product family. If they are not, the Make a Cluster of
Receivers procedure won’t work. This is because only receivers that were
designed to work together (as a single product) can be made into a Cluster.
FCC Statement
This equipment has been tested and found to comply with the limits for a Class B digital device, under Part 15 of the FCC Rules. These limits are designed to provide reasonable protection against harmful interference in a residential installation. This equipment generates uses and can radiate radio frequency energy and, if not installed and used by the instructions, may cause harmful interference to radio communications. However, there is no guarantee that interference will not occur in a particular installation. If this equipment does cause harmful interference to radio or television reception, which can be determined by turning the equipment off and on, the user is encouraged to try to correct the interference by one or more of the following measures:
- Reorient or relocate the receiving antenna.
- Increase the separation between the equipment and the receiver.
- Connect the equipment to an outlet on a circuit different from that to which the receiver is connected.
- Consult the dealer or an experienced radio/TV technician for help.
This device complies with part 15 of the FCC Rules. Operation is subject to the following two conditions:
- This device may not cause harmful interference, and
- This device must accept any interference received, including interference that may cause undesired operation.
Any Changes or modifications not expressly approved by the party responsible for compliance could void the user’s authority to operate the equipment.
This equipment complies with FCC radiation exposure limits set forth for an uncontrolled environment. This equipment should be installed and operated with a minimum distance of 20cm between the radiator & your body.
IC Warning
This device complies with Industry Canada license-exempt RSS standard(s).
Operation is subject to the following two conditions:
- This device may not cause interference, and
- This device must accept any interference, including interference that may cause undesired operation of the device.
Changes or modifications not expressly approved by the party responsible for compliance could void the user’s authority to operate the equipment. This equipment complies with IC radiation exposure limits set forth for an uncontrolled environment. This equipment should be installed and operated with a minimum distance of 20cm between the radiator & your body. This transmitter must not be co-located or operating in conjunction with any other antenna or transmitter.
This radio transmitter [IC:3534A-PL5572] has been approved by Innovation, Science and Economic Development Canada to operate with the antenna types listed below, with the maximum permissible gain indicated. Antenna types not included in this list that have a gain greater than the maximum gain indicated for any type listed are strictly prohibited for use with this device.
Antenna Types
| Maximum gain (dBi)|
Impedance
---|---|---
Printed Inverted-F PCB Antenna| 3.29| 50
Contact Information
Eleven Engineering Incorporated
- 10150-100 street, suite 900 Edmonton, Alberta, Canada T5J 0P6
- T: (780)425.6511
- F: (780)425.7006
- www.ElevenEngineering.com.
Read User Manual Online (PDF format)
Read User Manual Online (PDF format) >>