Zupapa ERV-I Bumper Car User Manual
- June 15, 2024
- Zupapa
Table of Contents

Zupapa ERV-I Bumper Car

Product Information
Specifications
-
Motor: 25W*2
-
Speed: 1.11-1.55-2.42mph
-
Suitable Age: 1.5-6 years old
-
Maximum User Weight: 88LBS/40KG
-
Package Dimension: 24.5X24.5X11.8inch
-
Gross weight: 22LBS / 10kg
-
Battery Charge Time: 8 – 12 hours
-
Operation Time: 3-4 hours (The usage time is related to the
road surface, as well as the user’s weight, speed, etc.) -
Operation Modes: Remote Control, Joysticks
Product Usage Instructions
Assembly
Step 1: Install the Backrest
Insert the backrest (#10) into the corresponding groove on the car body (#12).
Step 2: Install Handrails and Joysticks
Install Handrail
Thread the thread through the handrail (#7).
Install Joystick
Install handrail screws (#39).
Connect the terminal wires on the joystick and the terminal wires on the handrail together.
Parts & Features
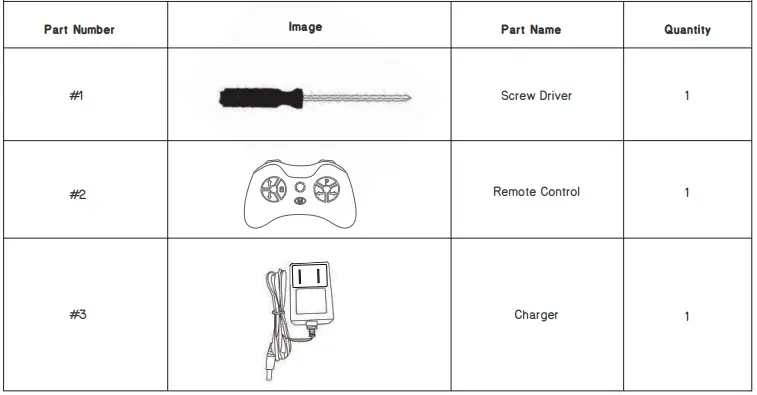
- Screw Driver (#1)
- Remote Control (#2)
- Charger (#3)
- Battery (#5)
- Joystick (#6)
- Handrail (Right) (#7-1)
- Handrail (Left) (#7)
- Bumper Strip (#9)
- Backrest (#10)
- Car Body (#12)
- Bumper Strip Fixed Cover (#16)
- Universal Wheel (#17)
- Motor Cover (#18)
- Axis Cover (#19)
- Gearbox & Motor (Left) (#21-1)
- Axis (#22)
- Car Wheel (#23)
- Motor Cover (Right) (#39)
- Nut (#40)
- Spanner (#41)
Safety Instructions
When using electrical product, basic safety precaution should always be followed including:
- Read all Instruction before use!
Frequently Asked Questions (FAQ)
Q: Can the bumper car be used for commercial purposes?
A: No, the bumper car is not intended for commercial use.
Q: What is the maximum weight limit for the user?
A: The maximum weight limit for the user is 88LBS/40KG.
Q: How long does it take to charge the battery?
A: It takes 8 – 12 hours to charge the battery.
Q: How long can the bumper car operate on a full charge?
A: The bumper car can operate for approximately 3-4 hours on a full
charge. Please note that the usage time may vary depending on the road
surface, as well as the user’s weight and speed.
IMPORTANT
- If you have any questions, suggestions, and (or) comments, please feel free to contact us at your earliest convenience. Zupapa® Customer Happiness Executives are standing behind to help out all the time. We promise you are sure to receive a reply in 12 hours.
- Check the Spam or your Message Settings if you do not receive a reply as it is probably blocked. Our Customer Happiness Executives will always get back to you no later than the given time frame.
ABOUT ZUPAPA
Brief
Our philosophy is to help the family members to PLAY together, ENJOY more
family time, and strengthen the BOND. Since the early 21st century, we have
served hundreds of thousands of families with high-quality trampolines, dome
climbers, hammocks & stands, baseballs & nets, inflatable SUPs, swings, and
gymnastics bars. We never slow down our pace to expand the business – we are
continuously working hard with carefully selected partners to provide more
safe and reliable products that can deliver joy and health to more families.
Our Purpose
We aim to accompany all kids to grow up healthy both physically and mentally
and create valuable memories for generations.
Our Vision
To be the preferred trustworthy brand in recreational sports and leisure
activities.
Our Product
Five-point safety belt, higher safety, raised backrest, better support for
children’s back, safety of remote control (can be used for emergency braking,
can be adjusted at any time when encountering obstacles), safety of materials,
non-toxic and environmentally friendly , good for children’s health.
Our Service
Standing behind the excellent products is the industrial-leading after-sales
service team. We provide a hassle-free warranty for all Zupapa® products.
Please do not hesitate to reach out to Zupapa® Customer Happiness Executives,
we will try our best to work it out for you.
SAFETY INSTRUCTIONS
When using electrical product, basic safety precaution should always be followed including.
Read all Instruction before use!
- To Protect against electrical shock, do not immerse cord, charger, transformer, battery, or the product in water or other liquid.
- Only use charging devices, transformer, and battery provided or recommended by the manufacturer.
- For your children’s safety, the product should by assembled by adult.
- This toy is suitable for children aged 1.5-6.
- Close supervision is necessary when your children is using the product.
- Unlatch the battery if not used for a long time.
- Do not use this product as a traffic tool.
- Do not use this product on public road, raceway, by the swimming pool, or at any potential dangerous places.
- Do not use this product on slippery surface.
- Always keep hands, hair, and clothing away from moving parts.
- Maximum users weight for this product is 88 lb / 40 kg.
- Do not change, modify or add any electrical wiring on this product.
- Avoid using this product in tight environment to prevent damage to the product or injury to the user.
- Do not use this product in the dark. Only operate this product during daytime or well lit area.
PRODUCT SPECIFICATION
- Motor: 25W*2
- Speed: 1.11-1.55-2.42mph
- Suitable Age: 1.5-6 years old
- Maximum User Weight: 88LBS/40KG
- Package Dimension: 24.5X24.5X11.8inch
- Gross weight: 22LBS / 10kg
- Battery Charge Time: 8 – 12 hours
- Operation Time: 3-4hours(The usage time is related to the road surface, as well as the user’s weight, speed, etc.)
- Operation Modes: Remote Control & Joysticks
PARTS&FEATURE
You can refer to the following chart for the part number, diagram, description, and quantity of each size. When you need the replacement(s), get in touch with Zupapa® Customer Happiness Executives, we are ready to make you 100% satisfied. Do not forget to provide the order number, part number, quantity, and pictures or video clips (if applicable) so that you can get what you need as soon as possible.

-
screw driver
-
remote control
-
charger
-
Seat Belt
-
Battery
-
Joystick
-
Handrail
-
Lampshade
-
Bumper Strip
-
Backrest
-
Seat Cover
-
Car Body
-
Button Plate
-
Joystick Cover
-
Lifting Handle
-
Bumper Strip Fixed Cover
-
Universal Wheel
-
Motor Cover
-
Axis Cover
-
The Bottom Cover
-
Gearbox & Motor
-
Axis
-
Car Wheel
-
Short Press: Horn Sound
Long Press: Reduce Volume -
Music Pause/Play
-
Short Press: Music Mode, Play the Next Song
Long Press: Increase Volume -
Short Press: Light ON/OFF Long Press: Bluetooth ON
-
Charging Port
-
Battery Indicator Light
-
Power Switch
-
Forward
-
Back
-
Speed Control Key
-
Speed Indicator Light
-
Code Matching Key
-
Parking Button
-
Turn Right
-
Turn Left
Parts List


ASSEMBLY
Step 1 Install the Backrest
- Insert the backrest (#10) into the corresponding groove on the car body (#12).
- Picture display after installation.

Step 2 Install Handrails and Joysticks
- Install Handrail

- Install Joystick


- Connect the terminal wires on the joystick and the terminal wires on the handrail together.
- Picture display after installation
- Fix the joystick on the handrail, and the connected terminal wires need to be placed inside the handrail.
- Picture display after installation.

Secure the joystick with screws (#39).
Next, install the handrail and joystick on the other side. The steps are the
same as here.
Step 3 Install Car Wheels
Please note: The screws must be tightened when installing the car wheels, otherwise they may shift when walking in a straight line.
-
Install the Axis, Gearbox&Motor,Car Wheels and Nuts together

This step requires two nuts (#40), two car wheels(#23), a Gearbox & Motor (Right) (#21-1), a Gearbox & Motor (Left)(#21), two Spanners(#42), and an axis(#22). The right side of the axis is connected to the right Gearbox & Motor (Right) and a car wheel and is finally fixed with a nut. The left side of the axis is connected to the Gearbox & Motor (Left) and a car wheel, are are finally fixed with a nut. -
Put the Assembled Parts into the Chassis

-
Connect Motor Terminal Wires

Perform the same operation to connect the terminal wire of the motor on the other side. -
Fix the Motor Cover
Use two screws (#39) to fix the motor cover (#18). (note that the motor cover is not divided into left and right). -
Fixed Axis Cover
Fix the axis cover (#19) with 4 screws (#39) each. (note the left and right parts of the axis cover).
Step 4 Install Caster Wheels
Use 4 screws (#41) to fix the front and rear universal wheels respectively. (Note that the universal wheels can be used for both front and rear).
Picture display after installation.
Step 5 Install Bumper Strip
Please note that the anti-collision strip is connected end to end at the
middle position behind the collision vehicle body. Be sure to install the
anti-collision strip as shown in the figure.
- First, tear off the rubber strips of the bumper strips, and then paste the anti-collision strip on the lower edge of the body.
- Secure the bumper strip cover with screws (#39).

Step 6 Install Seat Cover
- Connect the Power Cord

- Install Seat Cover

Step 7 Stickers: Users can Put Stickers anywhere on the Car and DIY Them by Themselves.
Step 8 Charging the Battery.
Note: Turn off the bumper car before charging.
- For first charging: Charge the bumper car for 4-6 hrs. But no more than 10 hours.
- For normal charging: Charge the bumper car for 8-12 hours. But no more than 20 hours.
- Charging indicator: If the batteries are totally empty, the charging indicator is green at the beginning of charging, then turns to red during charging, and finally turns green when fully charged. If the batteries are not empty, the charging indicator is red at the beginning of charging, then turn to green when fully charged.
Step 9 Remote Control Coding and Remote Control Button Instructions (attached to the back of the remote control)
Operation manual: For the first time to use Need to frequency bind
- Take out the remote control, install the battery.
- Long press on the button “M” for 2-4. seconds, Indicator light will flash.
- Tum on the power of the car,Indicator light flashes to long lighting, then frequency bind succeed.
- If the frequency bind failed(Indicator light flashes), remove the battery repeat steps 1~3.
- Remote control without operation after 10 seconds, Indicator light will off power saving mode. Button Description: forward backward turn left turn right S:Speed P: Emergency brake, press it and the running function will fail, press again, it release.
Step 10 Connect to Bluetooth:Press the Bluetooth Button on the Car Control Panel to Turn on the Bluetooth Function, Search the Bluetooth Name “Bumper Car ERV-I” on Your Phone, Select and Pair.
CARE&MAINTENANCE
- Check the product regularly and make sure there is no missing or loose parts. Re-tighten any loose parts if necessary.
- Make sure there is no cracked or broken plastic parts.
- When not using, store the product away from heat source, cover it with a tarp and away from wet weather.
- Turn off the product and disconnect the battery if the product is not use for a long period of time.
- Clean the vehicle with a cloth. Use a non-wax furniture polish to restore shine to plastic parts. Do not use abrasive cleaner.
- Do not wash the product with a hose or immerse any parts in water or other liquid.
- Occasionally use lightweight oil to lubricate moving parts.
LIMITED WARRANTY
We offer 1 year warranty to the main body, including the batteries and plastic shell. We offer lifetime warranty for the remote control, charger, joystick, bolt driver.
WARNING
This device complies with part 15 of the FCC Rules.Operation is subject to the following two conditions: (1) This device may not cause harmful interference, and (2) this device must accept any interference received, including interference that may cause undesired operation.
NOTE: This equipment has been tested and found to comply with the limits for a Class B digital device, pursuant to part 15 of the FCC Rules. These limits are designed to provide reasonable protection against harmful interference in a residential installation. This equipment generates, uses and can radiate radio frequency energy and, if not installed and used in accordance with the instructions, may cause harmful interference to radio communications. However, there is no guarantee that interference will not occur in a particular installation. If this equipment does cause harmful interference to radio or television reception, which can be determined by turning the equipment off and on, the user is encouraged to try to correct the interference by one or more of the following measures:
- Reorient or relocate the receiving antenna.
- Increase the separation between the equipment and receiver.
- Connect the equipment into an outlet on a circuit different from that to which the receiver is connected.
- Consult the dealer or an experienced radio/TV technician for help.
MODIFICATION: Any changes or modifications not expressly approved by the grantee of this device could void the user’s authority to operate the device.
WARNING
To reduce the risk of injury, adult supervision is required. Never use in
roadways, near motor vehicles, on or near steep inclines or steps, swimming
pools other bodies of water; always wear shoes,and never allow more than 1
rider.
RISK OF FIRE, Do not bypass. Replace only with the original size and type.
ADDITIONAL CONDITIONS
Colors may vary slightly from the photos because of photography and printing
tolerances.
Sizes stated in U.S. standard measurements may vary slightly due to product
are manufactured using the metric system.
Problem
|
Possible Reason
|
Solution
---|---|---
Vehicle Does Not Move
|
Low Battery
|
Fully Charge the Battery
Disconnected / Badly Connected Battery
|
Reconnect the Battery.
Failed Battery / Engine
|
Contact Customer Service
Vehicle Does Not Run Very Long
|
Low Battery
|
Fully Charge The Battery
Old Battery| Replace Battery . Contact Customer Service If Necessary
Vehicle Runs Very Slow
|
Low Battery
|
Fully Charge The Battery
Old Battery
| Replace Battery . Contact Customer Service If Necessary
Vehicle Is Overloaded| Make Sure User’s Weight Is Under 88 LBS
Vehicle Is Being Used In Harsh Environment| Avoid Using The Vehicle In Harsh
Environment
2.42 Mph Cannot Meet Your Needs
| 2.42 Mph Is The Certification Speed For Children’s Products
Vehicle Needs a Push To Go Forward
|
Poor Wire Connection
| Check If The Battery Connectors
Are Firmly Connected. Contact Customer Service If Necessary
Loud Grinding Sound Or Clicking Sound From The Motor Or Gear Box
|
Damaged Motor Or Gear Box
|
Contact Customer Service
Battery Does Not Charge
| Disconnected / Badly Connected Battery|
Reconnect The Battery
Disconnected / Badly Connected Charger
|
Make Sure The Charger Is Firmly Plugged Into The Power Source And Connected To The Charging Port
Charger Not Working
| Contact Customer Service
Joystick Is Not Working
|
Poor Wire Connection
|
Reconnect The Wire.If the Fault still cannot be Solved,Please Contact Customer Service
Broken Joystick
|
Contact Customer Service
Control Is Not Working
|
No Battery Installed
|
Insert Two Batteries
---|---|---
Pairing Failed
|
Follow The Step 3 To Repair
Out Of Remote Control Range
| The Remote Control Shall Not Exceed 35m. Contact Customer Service If Necessary
Broken Control
|
Contact Customer Service
Charger Feels Warm With Charging|
Normal
|
Appendix
Zupapa Product Categories
Outdoor Trampoline
Not any kid can refuse the bouncing fun! Zupapa® Saffun Safump outdoor
trampolines are the ultimate gift idea for your kids, making the backyard a
safe jumping playground for years.
SMALL TRAMPOLINE
Are you looking for a perfect place for your preschool and school-age boys
and girls to free up their energy? Try a Zupapa trampoline for small kids with
the basket hoop, which is a great combination of safety and fun!
Rebounder
A great structure to make home workout easy! Do not hesitate to take a Zupapa®
rebounder home as it helps to keep fit and stay in shape.
Dome Climber
It’s the safety, reliability, and versatility that make Zupapa® dome climber
stand out from the same category. The heavy-duty construction enables up to 6
kids to play together – they can climb, dangle, or play underneath, making
your backyard an exciting playground that will entertain your kids for years.
Gymnastics Bar
Adjustable in both the support base & height, Zupapa® gymnastics bars are one
of the great folding equipment to entertain your kids. Rest assured to take
one home.
Baseball Net
Every hit and every pitch would make a difference. See how your kids make
progress day by day with the baseball practice combo from Zupapa®.
Paddle Board
A necessity for water-loving ones. The most alluring, you can surf together
with your furry friends (of course, if they are not afraid of water and are
glad to go surfing with you).
Hammock Stand
Nothing is better than reposing on a Zupapa® hammock set while the gentle
breeze and warm sunlight give a pat on your body! You can imagine how
delightful it would be to enjoy such a cozy time with the whole family!
Tree Swing
Providing enjoyable outdoor toys works great to reduce the time that kids
spend on computer games and TV series. Zupapa tree swings are a practical
choice. Hang it to a playset or underneath a tree, and add a detachable tent
(if required), your kids would love to stay outdoors more than before!
Read User Manual Online (PDF format)
Read User Manual Online (PDF format) >>