
SABA L11 Thermal Bluetooth Label Printer Instruction Manual
- June 14, 2024
- SABA
Table of Contents
THERMAL BLUETOOTH
LABEL PRINTER Instruction
Manual
Model No.: L11
Read this instruction manual carefully before use and keep for future
reference.
WARNING
- Make sure that the paper bin is clean before using the printer. If there is any debris in the paper bin, the print head may be damaged during printing. In case of any debris,use a special cleaning device or alcohol to clean the paper bin and print head.
- Turn off the power immediately when the printer malfunctions.
- There are complex circuits and devices inside the printer, please do not disassemble the printer without authorization.
- Charge the battery in a cool and airy room. Do not expose the printer and power adapter, in high-temperature and high-humidity environments, or water to avoid short circuits that can cause the battery to heat up, smoke, deform, damage, or even explode. If the power adapter comes into contact with water or other liquid, cut off the power immediately. When you notice smoke or an odour from your printer or power adapter, unplug the power adapter immediately and take care to avoid fumes.
- Please do not squeeze, mechanical vibration, shake the printer and power adapter, remove or modify the power adapter. It is forbidden to use the power adapter when the power cord is damaged, otherwise it will cause electric shock, fire and damage to the power adapter
- When unplugging the printer, grip the power adapter. Pulling the power cable will damage the cable.
- Do not use the printer near flammable products.
- There is a built-in lithium battery, please do not use in the environment with temperature higher than 40°C; keep away from fire and other heat sources, and do not place it in the hot sun, such as closed car;
- Once fully charged, make sure to disconnect to avoid overheating.
- Operating temperature range is 0°C to 40°C, please do not exceed the recommended temperature range.
- This product is not a toy and should only be used by children under supervision of an adult.
PACKAGE CONTENT

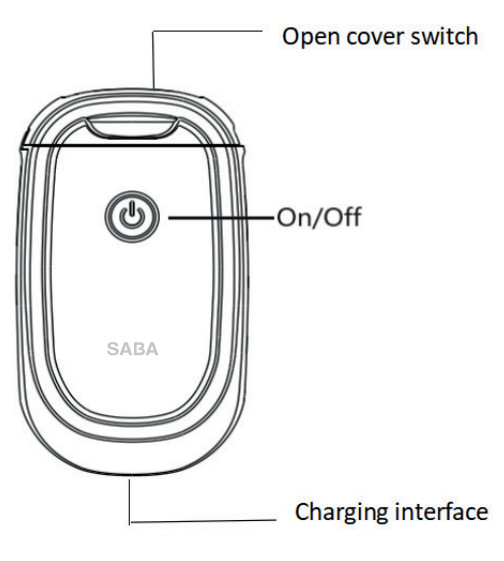
- Green light: fully charged/ in normal use
- Red light charging/ paper shortage/ overheating/ cover opening
- Red light flashing: low power will cause the printed handwriting to be weak, please charge it in time
- Orange light is on: debugging mode has been entered. Press and hold the power button to shut down to exit debugging mode
SETUP
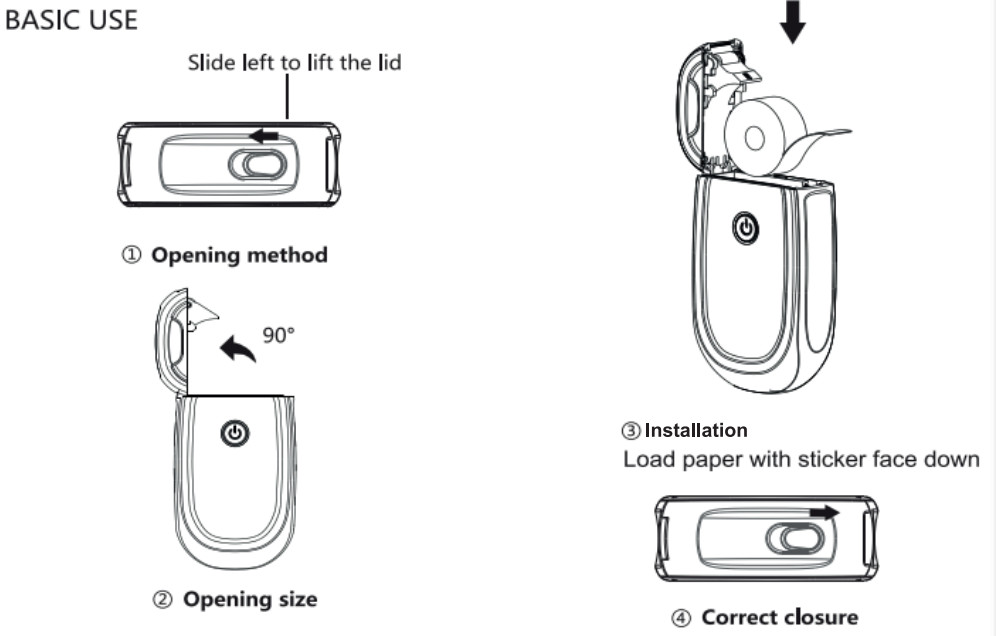
- Open the top of the label printer. Push the label on the top and lift up.
- Undo the roll of label stickers and pull the end out from the bottom of the roll.
- Close the top until it clicks. Make sure the end of the sticker roll is coming out through the slot.
- Turn the label printer ON. Press and hold the power button until the light turns green.
Note:
A green light indicates that the device is ON.
Ared light indicates that the device has a problem.
Aflashing red light indicates that the device has a low battery.
APP SETUP
-
Search Flash Mini in Google Play or APP Store.https://play.google.com/store/apps/details?id=com.futureprt.flashminihttps://apps.apple.com/us/app/flashmini/id1621669702
-
To turn on long press the On/Off button for 3 seconds • The indicator light will be green and enter into pairing mode.
• Turn on the Bluetooth on your smartphone
• Click on the Bluetooth key In the dialogue box, select the name (L11_XXXX_BLE the XXXX is unique to each unit) click on connected successfully. -
In “FlashMini” APP
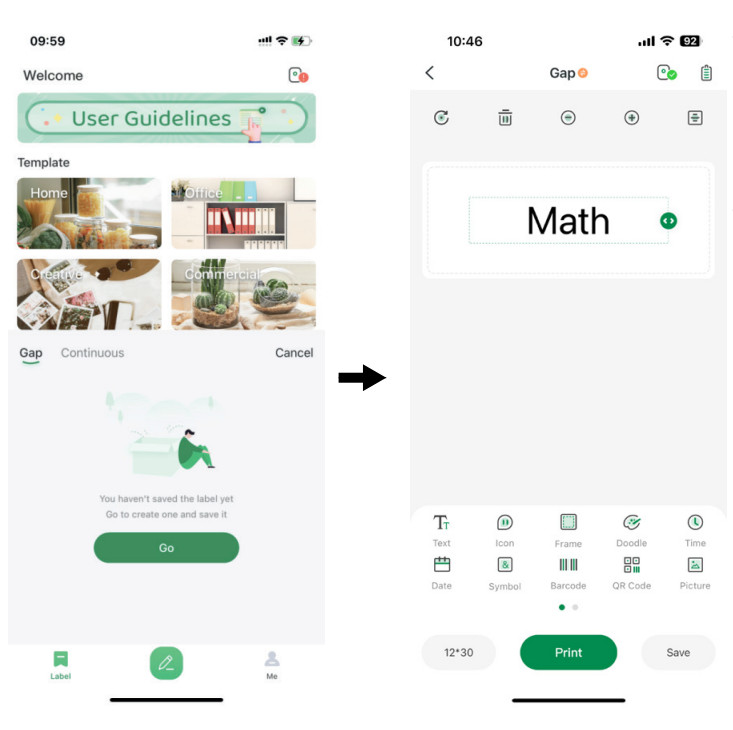 • Tap “Gap”, then tap “Go” Tap “text” then tap twice and input text , then tap “Print’
• Choose number of copies as per demand, then tap “ok”,start printing
| Interpret | Rotate | Delete | Shrink | Enlarge | Align |
|---|---|---|---|---|---|
| Icon |
-
Select label pape
Click “12*30” to select label paper, make sure same as actual label paper.
Max width : 15mm
Min width : 12mm -
Click on[Text],[Double click]pops up, then edit labels in the entry bar.
CHARGING
To charge your label printer, plug the USB cable into the bottom and plug the
other end into a USB adapter/wall outlet. 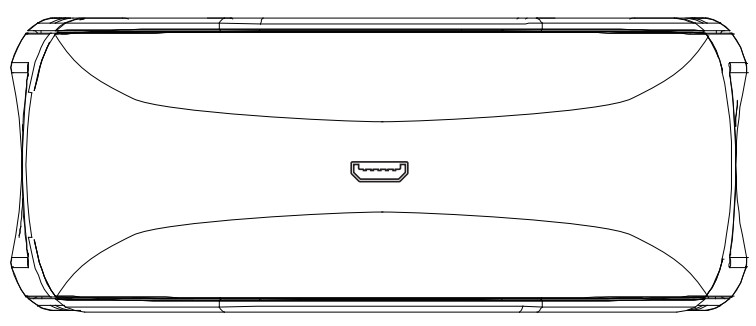
TROUBLESHOOTING
| Problems | Solution |
|---|---|
| 1. The printer only loads paper without printing data during printing. | 1. |
Check whether the print paper is reversed. If not, print the self-test page
through the APP to check whether the self-test page is printed correctly.
2. If the self-test page cannot be printed,the printer is faulty. If the
self-test page can be printed
correctly, check the paper or APP.
2. The printing are blurry.| 1. Please confirm the printing density set by
the printer. If the default value is 2, the effect will be
the best.
2. If aline or piece of paper is not printed,check whether the print head is
dirty and clean it with
alcohol.
3. If the paper quality is poor, please use the print paper.
3. The printer keeps delivering paper while loading paper and printing.| If
no gap marking is detected after 200 mm paper is loaded, there are three
possible reasons.
1. Check the paper type set for the printer, which supports only proprietary
thermal paper.
2. If the printer cannot be stopped and makes clicking noise at the same
time, this roll has
been used up. Replace it with a new one.
3. If neither of the preceding problems occurs,open the paper bin and close
it to restart printing. the problem persists, the printer is faulty.
4. An out-of-paper error is suddenly prompted during printing.| Check whether
the current print paper has been used up.
5. The printer suddenly stops during printing.| In order to ensure the
reliability of the printer, multiple protections are designed in case of the
out-of-paper error, open paper bin, data error, over temperature, and low
battery. Please analyse the reasons according to the different prompts on the
APP.
SPECIFICATIONS
Print speed: 3.15in/s (80 mm/s)
Printing method: Thermal printing
Paper type: Thermal roll paper
Sticker size: 1.2 1in x 0.5 in (30 mm x 12 mm)
Interface: USB
Battery (standby): 60 days
Working time: 3 – 4 hours
REFILL
This product is compatible with 12-15mm width continuous or pre-cut thermal
label stickers, use the key word “12mm Thermal Adhesive Label” on Amazon or
any other stationary online shop to search for refill purchase.
WARRANTY AGAINST DEFECTS
Our goods come with guarantees that cannot be excluded under the Australian
Consumer Law.
You are entitled to a replacement or refund for a major failure and
compensation for any other reasonably foreseeable loss or damage. You are
entitled to have the goods repaired or replaced if the goods fail to be of
acceptable quality and the failure does not amount to a major failure.
IFI AU Pty Ltd will repair or replace such defective goods for up to 1 year
from the date of purchase. This warranty is against defects in the goods
purchased and does not cover damage caused by the incorrect use or
installation of the goods or by modifications or by accident. To claim under
the warranty you need to return the product to the place of purchase ( at your
expense ) with a valid receipt or other proof of purchase.
If you are not able to return the product to the place of purchase, please
contact: support@ifisource.com or call
customer service hotline: +61 1300522523 Mon.- Fri.9am – 5pm AEST
This limited warranty applies only to products purchased with in the territory
of Australia.
FCC Warning Statement: Changes or modifications to this unit not expressly
approved by the party responsible for compliance could void the user’s
authority to operate the equipment. This equipment has been tested and found
to comply with the its for a Class B digital device, pursuant to Part 15 of
the FCC Rules. These limits are designed to provide reasonable protection
against harmful interference in a residential installation. This equipment
generates, uses and can radiate radio frequency energy and, if not installed
and used in accordance with the instructions, may cause harmful interference
to radio communications.
However, there is no guarantee that interference will not occur in a
particular installation. If this equipment does cause harmful interference to
radio or television reception, which can be determined by turning the
equipment off and on, the user is encouraged to try to correct the
interference by one or more of the following measures:
- Reorient or relocate the rec ing antenna.
- Increase the separation between the equipment and receiver.
- Connect the equipment into an outlet on a circuit different from that to which the receiver is connected.
- Consult the dealer or an experienced radio/TV technician for help.
This device complies with Part 15 of the FCC Rules. Operation is subject to
the following two conditions: (1) this device may not cause harmful
interference, and (2) this device must accept any interference received,
including interference that may cause undesired operation.
FCC Radiation Exposure Statement
The device has been evaluated to meet general RF exposure requirement. The
device can be used in portable exposure condition without restriction.
Read User Manual Online (PDF format)
Read User Manual Online (PDF format) >>