AIO WSS-100BPL Stand Fan Activejet Selected Instruction Manual
- June 4, 2024
- AIO
Table of Contents
AIO WSS-100BPL Stand Fan Activejet Selected

Components
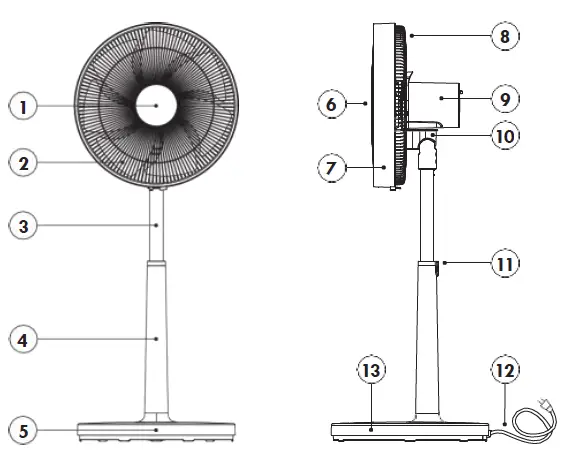
- Front cover cap
- Fan propeller
- The inner column of the tripod
- The outer column of the tripod
- Fan base
- The propeller front cover
- The outer ring of the cover
- The propeller rear cover
- Engine protection
- Movable motor carrier head
- Height adjustment button
- USB power supply cable
- Base cover
Modern stand fan Activejet WSS-100BPL will effectively set large masses of air in motion, providing an instant feeling of cooling on hot days. It is easy to use, extremely quiet and takes up little space. It has an advanced speed control system with a touch panel, remote control. T he fan also has an oscillation function and the adjustable angle, so the produced airflow can reach all parts of the room. It is designed for use in residential, commercial and office spaces.
Features
- A large propeller with seven blades.
- Extremely quiet DC motor.
- 18 rotation speeds / 3 modes of operation.
- 10-hour Timer.
- Touch control panel with LED display.
- Remote control.
- Oscillation function – horizontal movement in the range of 80 degrees (with possibility of switching off). Vertical angle adjustment of the head within 20 degrees.
- The telescopic height adjustment allows for smooth lifting and lowering of the fan.
- The stable base with internal ballast prevents the device from accidentally tipping over.
- Unique and elegant look.
- Easy to assembly. You can disassemble the fan after the season.
NOTE:
- Before using the fan, read the Instruction Manual. We recommend that you keep this manual for future reference.
- While the fan is in operation, it is advisable to follow the basic safety rules to avoid a fire, electric shock and mechanical damage to the body.
- Observing the instructions and recommendations contained in the Instruction Manual extends the device’s service life.
SAFETY RULES:
- Do not attempt to repair the device yourself.
- Keep the device work area in order.
- Keep the device away from moisture and water, explosive and flammable substances and particles. Failure to follow these rules may result in a fire or electric shock. Excessive dusting of the device may lead to overheating of the motor and permanent damage to the fan.
- It is forbidden to use wires with the plug that is not original or any adapters.
- Take care of the power cord. Do not use the cord to move the device, pull it or pull the plug from the power outlet. Protect the cable from heat, mechanical damage, oil.
- Do not put your fingers or devices in the air outlet/inlet grille. Take care that long hair is not screwed into the propeller of the device in use.
- The device is not intended for people with limited physical, sensory or mental abilities. Children under the age of 8 and people with restrictions may use the device only under the supervision of a person responsible for their safety.
- Do not cover the device e.g. with clothes, do not use it for drying wet clothes, etc.
- Make sure that the power supply complies with the voltage specified for the device (220-240V ~ / 50-60 Hz).
- Installation, disassembly, cleaning and maintenance of the fan may take place only after removing the plug from the socket.
- Do not leave the switched on device unattended.
- The device is intended for use indoors, in clean and dust free rooms. The fan should be placed on a hard, flat surface at a d istance of 0.3–1 m from all objects, such as radiators, other electrical appliances, furniture, and curtains.
TECHNICAL DATA
- Model: WSS-100BPL
- Voltage and frequency: AC 220–240 V, 50–60 Hz Power consumption: 32W
- Propeller diameter: 36 cm
- Height: 77 – 100 cm (adjustable)
- Weight: ~6,5 kg
- Colour: white
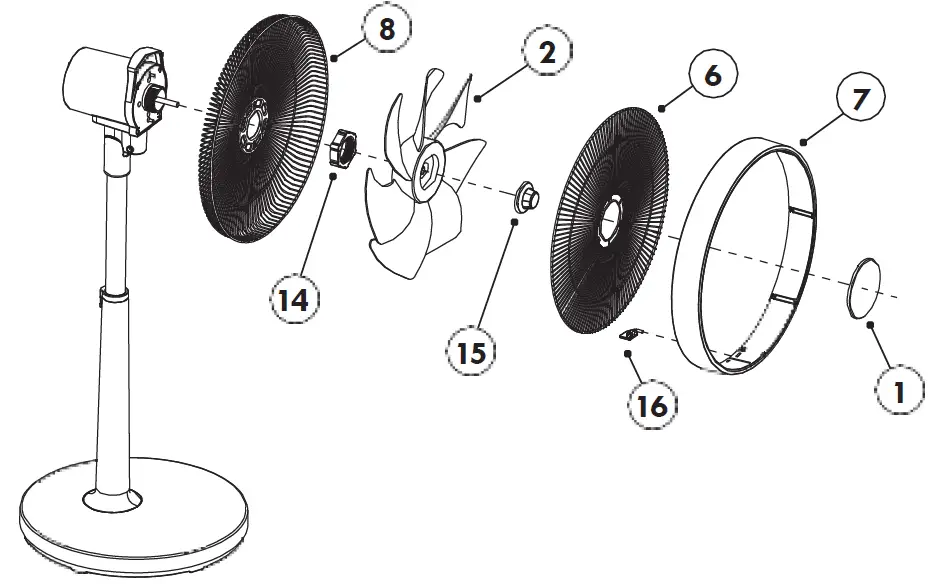
ASSEMBLY
- Start the assembly by assembling the fan base. Place the tripod with the lower, thicker tube in the base hole and attach a large safety nut on the underside. Tighten the nut firmly clockwise.
- The base is assembled in this way place on a hard, stable base.
- Put the rear propeller cover (8) on the engine, lock the large nut (14) (clockwise).
- Place the fan propeller (2) on the engine shaft and secure with the nut (15) (NOTE – counterclockwise).
- Replace the propeller front cover (6) and the outer ring of the cover (7), with the connector (16). Place the cap (1) in the front opening of the cover.
CONNECTION TO THE NETWORK
Ensure that the mains supply at your location matches the voltage shown on the nameplate of the device. If the mains plug of the device has a protective earth contact, use only electrical outlets that also have a protective earth contact, i.e. a so-called earth pin.
USE
Make sure that the fan is placed on a flat and level surface away from other heat sources, at a sufficient distance from curt ains and other lightweight materials that the air rush could pull into the fan.
-
On / Off. When the power is turned on, the ON / OFF button„ „ will light up red. To start the fan for the first time, press this button once. The fan willstart in„normal” mode with 18 speeds. At the same time, the„+” and„-” sensors are activated (illuminated). They allow to set the desired fan speed 1 – 18. Pressing„ „ again will switch off the fan.
-
Timer. Temporary shutdown function. With the fan on, press the„ „ button once. The corresponding light under the button will light up.
-
The time after which the fan is to be switched off is set with„+” and„-” sensors. Setting range from 1 to 10 hours.
-
Timer. Temporary switch-on function. With the fan off (standby mode) press the„ „ button once. The corresponding light under the button will light up. The time after which the fan is to be switched on is set with„+” and„-” sensors. Setting range from 1 to 10 hours.
-
Wind mode. Pressing the„ „ button again will activate the„Natural” mode, which simulates a variable wind speed through a variable, random speed. The corresponding„Natural wind” mode light will light up. By pressing the„+” or„-” button, you can change the blowing force in natural mode to„mild wind”. (display shows F1),„medium wind” (F2),„strong wind” (F3) or„silent wind” (display shows F4).
-
Sleep mode. The next, third press of the„ „ button activates the„Sleep” mode, where the speed of blowing changes very smoothly and gently within a certain range, acting as a calming and finally asleep. The corresponding„Sleep Mode” light will light up. The„+” or„-” button can be used to change the blowing force„very mild soporific wind”. (the display shows P1),„mild soporific wind” (P2),‚medium soporific wind (P3) or‚ quiet soporific wind’. (display shows P4).
-
Pressing„ „ again will return to timer mode.
-
The sequence for changing the operating mode is as follows:„Timer → Natural mode → Sleep mode”.
-
Oscillation function. To turn on the oscillation, after turning on the power, press the„ „ button. Press this button again to disable the function.
-
Automatic switching off the display. After the setting is completed, if no operation is performed for 1 minute, all the indicators will go out
and only the„Power” check box will be left (the red light flashes every 15 seconds). The display is activated by pressing any key. -
Automatic switching off. The fan will automatically switch off after 12 hours if there are no commands from the control panel or remote control. Remote control. The buttons on the remote control correspond to the main functions of the fan housing.
-
The fan has a memory function, but all settings will be reset when disconnected from the mains.
-
Height adjustment. To set the desired fan height, press the button in the center of the tripod, slide out or slide in the top of the column and release the button.
CLEANING AND MAINTENANCE:
Disconnect the fan from the power supply before cleaning. Use a slightly damp cloth (moistened with water) for cleaning. Never wash the device under running water or immerse it in the water!
- Disconnect the power supply, release the connector terminal on the underside of the cover, remove the front of the propeller cover.
- Unscrew the propeller holding nut (clockwise) and remove it from the engine axis.
- Unscrew the large nut holding the rear cover (counterclockwise) and remove the cover.
- Put the front and rear cover in water with washing liquid for 10 minutes and then clean it with a brush. After rinsing, wipe and dry with a dry cloth.
The dust on the fan blades can be wiped with a sponge and then dried with a
dry cloth.
Note : Do not use solvents or volatile chemicals for cleaning.
After cleaning and drying, fold it back together in the reverse order to the
disassembly described above.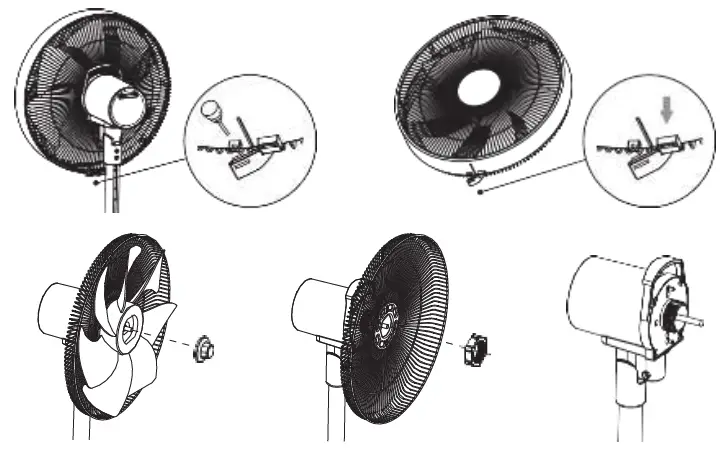
We recommend unplugging the fan from the power supply during the storm or long periods of non-use.
POSSIBLE FAULTS:
If the device is not working, first check the voltage in the power outlet. The
best way to do it is to connect some other testes electrical device to the
power outlet.
Possible faults, causes, and remedies.
| Fault | Cause | Remedy |
|---|---|---|
| The device does not work. | 1. No power supply, no light is on. | Check the |
power supply:
– is the power cord damaged? If yes, absolutely give the device back to the service.
– is the cable plugged into the socket?
If not, insert the plug into the socket.
2. It does not respond to commands from the remote control.| Replace the
batteries in the remote control.
Poor output of the device.| 1. Inefficient mode of operation set.| Switch the
unit to a stronger airflow mode.
---|---|---
2. Foreign bodies brake the engine.| Disconnect the fan from the power
outlet!
Check that there are no hairs or threads wound on the motor axis between the housing and the propeller.
If so, take off the front cover, the propeller, and remove it.
Unusual sounds coming out of the device.| 1. Foreign bodies in the device.| First, disconnect the fan from the power outlet!
Remove the foreign bodies from the fan propeller cover (basket). Turn it on again.
2. Some parts of the device are not tightened.| First disconnect the fan from the power outlet! Check and tighten all the screws and nuts in the unit. Turn it on again.
WARRANTY TERMS AND CONDITIONS
-
Activejet fans are covered by a 24-month warranty. The warranty period starts from the date of purchase of the product as shown on the proof
of purchase. -
The warranty covers defects caused by factory-based defective materials, improper assembly (factory), manufacturing errors.
-
The warranty does not cover defects resulting from: use contrary to the purpose and recommendations of the Instruction Manual, overloading the device leading to the damage of the engine or mechanical transmission components, making repairs on one’s own or by unauthorized persons, modifying the construction, physical and chemical damage caused by external factors, and damage caused by the improper assembly as well as mechanical damage.
-
The warranty does not cover parts subject to natural wear during operation: thermal fuses, electrostatic brushes, V-belts, tool holders, accumulators, working tips of power tools.
-
The nameplate of the device should be legible. The returned/claimed product should be carefully protected against damage in transit.
-
As far as possible, provide the product in the original packaging.
-
In order to use the warranty, visit your point of purchase with a legible proof of purchase (receipt, invoice).
-
The warranty is handled by the sole distributor and owner of the brand: Action S.A., Zamienie, ul. Dawidowska 10, 05-500 Piaseczno, Poland.
MEANING OF THE SYMBOL:
A crossed out trash bin symbol means that the device should not be disposed of in normal waste containers. It is the responsibility of the user to hand over the used equipment to the collection points for the recycling of waste generated from electrical and electronic equipment.
CE DECLARATION OF CONFORMITY:
The device has been manufactured in accordance with the applicable European standards, including the relevant directives and regulations in force in the European Union for electrical products. This means that the product complies with the principles of safe use, health and environmental protection.
References
Read User Manual Online (PDF format)
Read User Manual Online (PDF format) >>