HOLACA B07Q3B3VFW 3rd Generation Stick Up Cam Plug In Instruction Manual
- July 3, 2024
- HOLACA
Table of Contents
HOLACA B07Q3B3VFW 3rd Generation Stick Up Cam Plug In
Product Information
Specifications
- Model: Stick Up Cam Plug-In
- Power Source: Quick Release Battery Pack or Plug-In
- Mounting Options: Stand, Wall, Ceiling
Product Usage Instructions
Step One: Charge the Battery (optional)
- Charge the Quick Release Battery Pack using a micro-USB cable until the green LED is lit.
- Twist and remove the battery cover on your Stick Up Cam.
- Insert the fully charged battery into the Stick Up Cam until it locks into place.
Step Two: Choose Your Location
Your Stick Up Cam can be placed on a stand, wall, or ceiling mount. Choose
a location that provides the desired view.
Step Three: Install Stick Up Cam
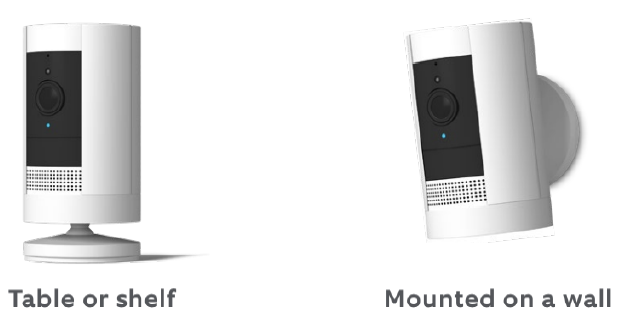
Table or Shelf Installation
- Place the Stick Up Cam at your chosen location within reach of a power socket.
- Check Live View in the Ring app to ensure the desired view.
Wall Installation
- Unscrew and remove the base of the Stick Up Cam.
- Attach the mounting bracket to the wall with included screws.
- Slide the Stick Up Cam onto the bracket hooks and secure it to the wall.
- Adjust the camera angle and check Live View in the Ring= app.
Ceiling Installation
Remove the base of the Stick Up Cam using a Phillips-head screwdriver.
FAQ (Frequently Asked Questions)
-
Q: Can I use multiple Stick Up Cams with one Ring app?
- A: Yes, you can add multiple Stick Up Cams to your Ring app for comprehensive home security coverage.
-
Q: Is the Stick Up Cam weatherproof?
- A: The Stick Up Cam Plug-In is suitable for both indoor and outdoor use and is weather-resistant, but it is not fully waterproof.
Installing your Ring Stick Up Cam Plug-In (3rd Generation) – Ring Help
For safety and compliance information for this product, click here.
Physically installing up your Stick Up Cam Plug-In is a simple process. Simply
scroll down for a step-by-step guide.
Note that you should set up your Stick Up Cam in the Ring app before
physically installing it. Click here for information on setting up your Stick
Up Cam Plug-In in the Ring app.
INSTALLATION STEPS
Step One: Charge the battery (optional)
The Stick Up Cam Plug-In can use a Quick Release Battery Pack as a power
backup (sold separately). If you have purchased a backup battery, make sure it
is fully charged by plugging it into a USB port using the provided orange
cable or any other micro-USB cable. The battery is fully charged when only the
green LED is lit.
- Remove the battery cover on your Stick Up Cam by twisting it counterclockwise to unlock.
- If the battery is already inserted, remove the battery.
- After charging, insert the battery into your Stick Up Cam until it locks into place.
Step Two: Choose your location
Your Stick Up Cam will be happy just about anywhere. It can sit on its own
stand, mounted to a wall or mounted to the ceiling with a Stick Up Cam Mount
(sold separately).
Choose a spot where it can provide the view that you want.
Step Three: Install Stick Up Cam on a table or a shelf
Place your Stick Up Cam at your chosen location. Choose a spot where it can
provide the view you want, within reach of a power socket.
Once you’re done, check Live View in the Ring app to make sure you have the
view you want.
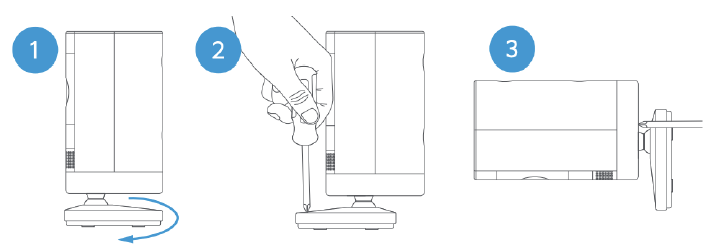
- If you’d like a downward camera angle
- Swivel the base around so that the long side faces the front, then tilt your Stick Up Cam so it points downward.
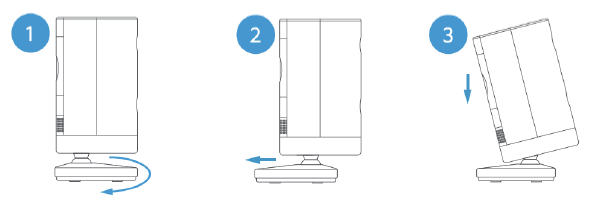
Install security screws if desired (see Step Four).
Step Three (alternative) : Install Stick Up Cam on a wall
Remove the base of your Stick Up Cam by unscrewing it using a standard
Phillips head screwdriver (not included).
Re-attach the base to the back of your device with the “UP” arrow pointing upward.
Remove the mounting bracket by sliding it down to remove it from the base.
Hold the bracket against your wall, making sure the “UP” arrow is pointing upward, and mount it with the included screws.
Mount your camera by guiding the grooves in the base on the hooks on the bracket. Slide your Stick Up Cam down to secure it to the wall.
You can now rotate your Stick Up Cam to the desired angle and check out Live View in the Ring app to make sure you have the view you want.
Install security screws if desired (see Step Four).
Step Three (alternative): Install Stick Up Cam on a ceiling
Purchase a Stick Up Cam Mount.
Remove the base of the Stick Up Cam by unscrewing it using a standard
Phillips-head screwdriver (not included).
Remove the plug from the back of the camera.
Screw the Stick Up Cam to the Stick Up Cam Mount, using the large silver screw that comes in your Stick Up Cam Mount packaging.
Attach the white rubber pad to the base of the Stick Up Cam Mount by pushing
the rubber pad into the base of the mount. Rotate the mount so that the base
is above the camera.
Place the Stick Up Cam where you want to mount it, and hold it in place. Use
the three mounting screws to secure the Stick Up Cam Mount base to the
ceiling.
Snap the cover onto the mount and install security screws if desired (see Step Four).
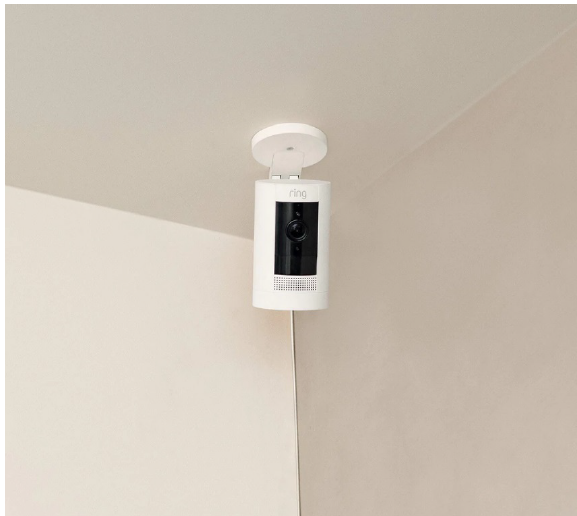
Important: If installing your Stick Up Cam on a ceiling, do not mount the camera upside-down. If you mount the camera upside-down, videos (available with Ring Protect plans) and Live View will
be upside-down. You cannot change the orientation of upside-down videos in the Ring app.
Step Four: Install the security screws (optional)
Your Stick Up Cam comes with two optional security screw locations. One
secures the battery compartment, and the other secures the mounting bracket to
the base. To access them after you’ve mounted your Stick Up Cam, rotate it to
either side.
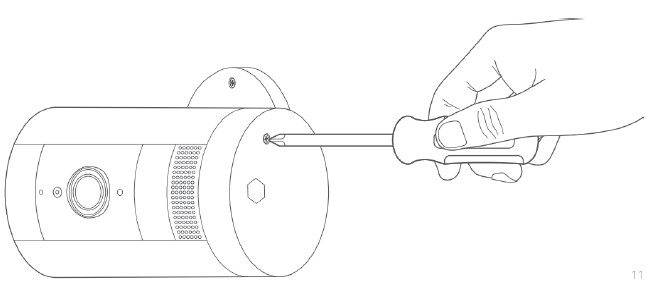
-
Open the battery compartment and/or remove the mounting bracket, then pop out the rubber plug(s).
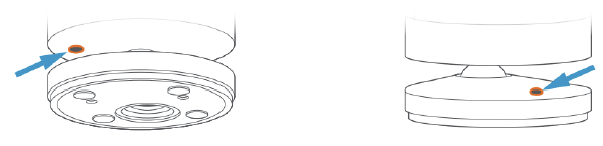
-
Swivel the base so the long side faces the front.
-
Insert and drive the security screw into the base screw location with a standard Phillips head screwdriver (not included).
Note: If installing your Stick Up Cam with the Stick Up Cam Mount, the security screw location is in the centre of the mount, and you can use the included star-shaped screwdriver to secure it. -
Turn your Stick Up Cam over to access the battery compartment screw hole, and drive the second security screw.
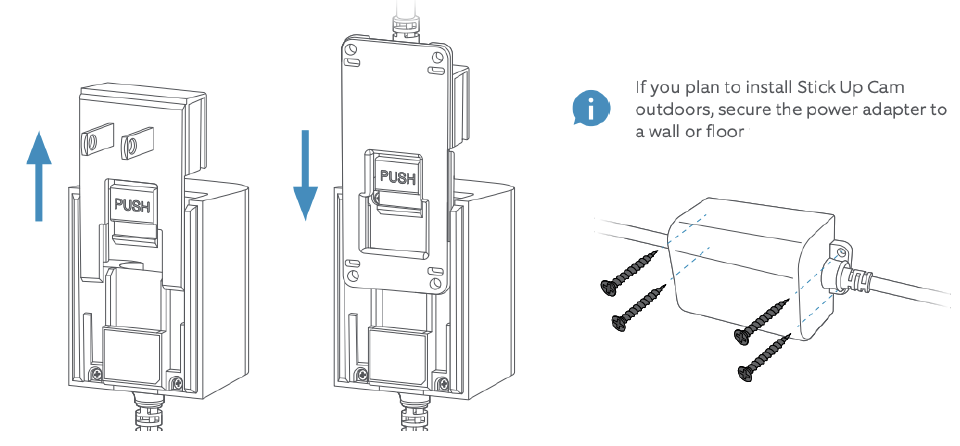
Installing outdoors
Remove the indoor plug faceplate by pressing the “PUSH” button and sliding it off of the adapter. Then grab the included outdoor power cable, and slide its connector onto the power adapter until it clicks into place.
References
Read User Manual Online (PDF format)
Read User Manual Online (PDF format) >>