Helihome MD04 Wall-Mount LED Light Bathroom Vanity Mirror Installation Guide
- June 3, 2024
- Helihome
Table of Contents
- IMPORTANT SAFETY INSTRUCTIONS
- BEFORE BEGINNING
- MAINTENANCE
- TOOLS AND MATERIALS REQUIRED
- HARDWARE LISTING
- MIRROR INSTALLATION
- MIRROR INSTALLATION
- INSTALL MOUNTING BRACKET
- CONNECTING ELECTRICAL WIRING
- MIRROR INSTALLATION
- MIRROR INSTALLATION
- MIRROR INSTALLATION
- MIRROR INSTALLATION
- CONNECTING ELECTRICAL WIRING
- MIRROR INSTALLATION
- User’s Guide
- Read User Manual Online (PDF format)
- Download This Manual (PDF format)
**Helihome MD04 Wall-Mount LED Light Bathroom Vanity Mirror Installation Guide
**
Read all instructions carefully before proceeding. Record the serial number on the back page and save this guide for future reference.
IMPORTANT SAFETY INSTRUCTIONS
SAVE THESE INSTRUCTIONS
Read all instructions before using
DANGE R – To reduce the risk of electric shock:
- Always unplug this furnishing from the electrical outlet before cleaning.
WARNING – To reduce the risk of burns, fire, electric shock, or injury to persons :
- Unplug from outlet before putting on or taking off parts.
- Close supervision is necessary when this furnishing is used by, or near children, invalids,or disabled persons.
- Use this furnishing only for its intended use as described in these instructions. Do not use attachments not recommended by the manufacturer.
- Never operate this furnishing if it has a damaged cord or plug, if it is not working properly, if it has been dropped or damaged, or dropped into water. Return the furnishing to a service center for examination and repair.
- Keep the cord away from heated surfaces.
- Never operate the furnishing with the air openings blocked. Keep the air openings free of lint, hair, and the like.
- Never drop or insert any object into any opening.
- Do not use outdoors.
- Do not operate where aerosol (spray) products are being used or where oxygen is being administered.
- To disconnect, turn all controls to the off position, then remove plug from outlet.
- WARNING: Risk of Injury – Keep children away from extended foot support (or other similar parts).
- WARNING: Risk of Electric Shock – Connect this furnishing to a properly grounded outlet only. See Grounding Instructions.
- For loading always put heavier items at the bottom and not near the top in order to help prevent the possibility of the furnishing tipping over.
- WARNING: Risk of Injury to Persons – do not place video equipment such as televisions or computer monitors on the product.
- WARNING: Risk of Injury to Persons – do not use this furnishing to support video equipment such as televisions or computer monitors.
SAVE THESE INSTRUCTIONS
GROUNDING INSTRUCTIONS
This procduce must connected to a grounded metal , permanent wiring system , or an equipment-grounding conductor must be run with the circuit conductors to the equipment-grounding terminal or lead on the prouct.
THANK YOU
We can assure you that FOCA has used the best materials and has applied the strictest quality control measures to ensure that each and every unit meets the highest quality standards. This booklet contains general information about the unit as well as step-by-step installation instructions.
BEFORE BEGINNING
- Carefully read the instructions before beginning the installation.
- DANGER! To avoid the risk of electrocution, please turn off the electricity mains before commencing the installation.
- It is strongly recommended that this installation be performed by a professional electrician
- It is recommended that you wear safety glasses at all times during the installation.
- A minimum of two people are needed to perform this installation.
- This product is wall mounted only
MAINTENANCE
Never use scouring powder pads, abrasive material, strong bleach or sharp instruments on metal components or glass. An occasional wiping down with a mild soap diluted in water is all that is needed to keep the mirror and aluminum parts looking new. Test products on a small inconspicuous surface prior to use.
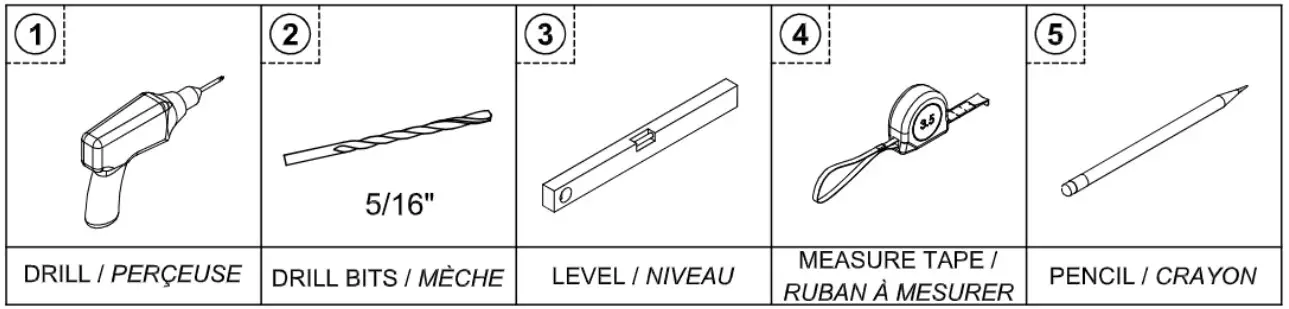
TOOLS AND MATERIALS REQUIRED
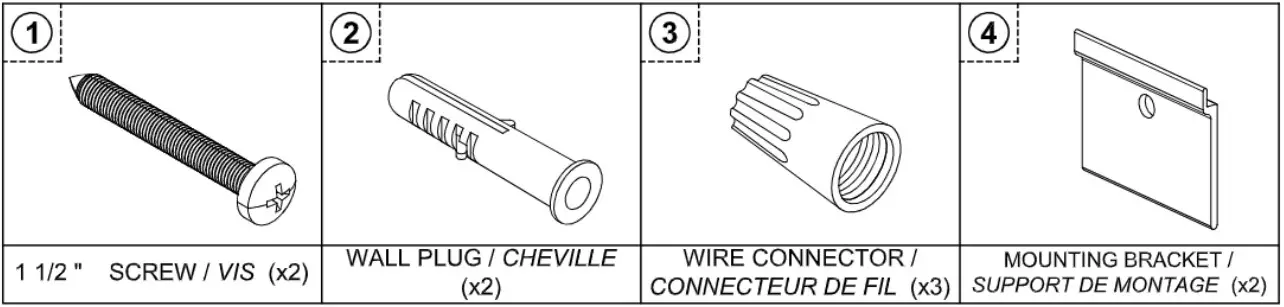
HARDWARE LISTING
CAUTION
 WARNING
To avoid the risk of electrocution, please turn off the electricity mains
before commencing the installation. We recommend the mirrors gets fitted by a
qualified electrician.
CAUTION
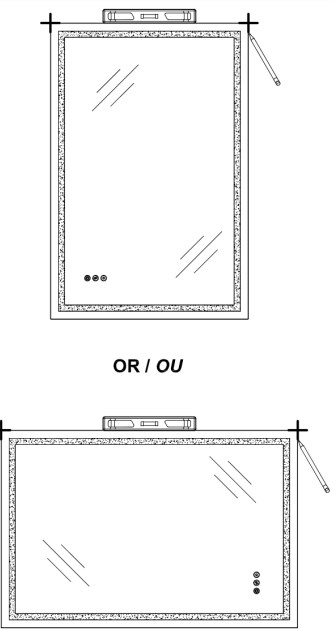
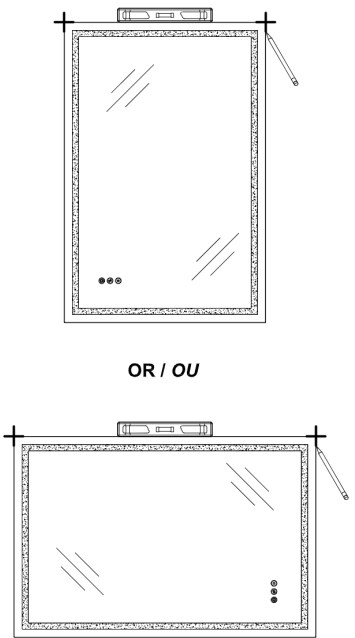
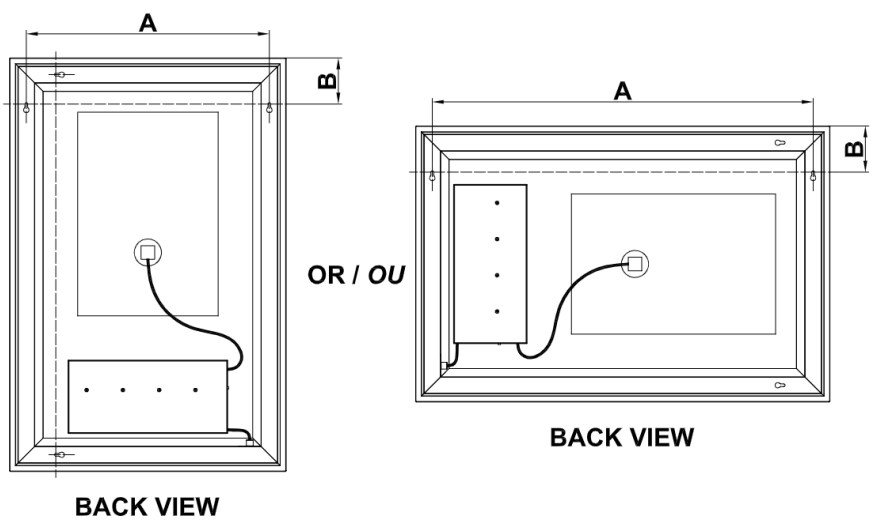
Two ways to install the mirror. Please choose according to your needs. Deux
facons d’installer le miroir. Veuillez choisir selon vos besoins.
MIRROR INSTALLATION
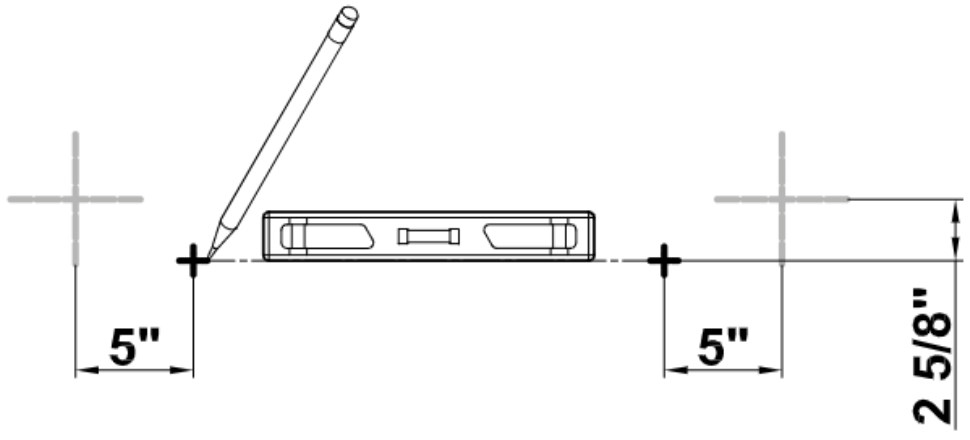
PLACEMENT Select the desired position of the mirror. Level and mark the location. Selectionner la position desire° du miroir. Niveler et marquer l’emplacement.
MIRROR INSTALLATION
SUPPORT LOCATION
Mark the drilling locations ensure marking are leveled. Marquez les
emplacements de forage pour vows assurer que les marques sont nivelees..
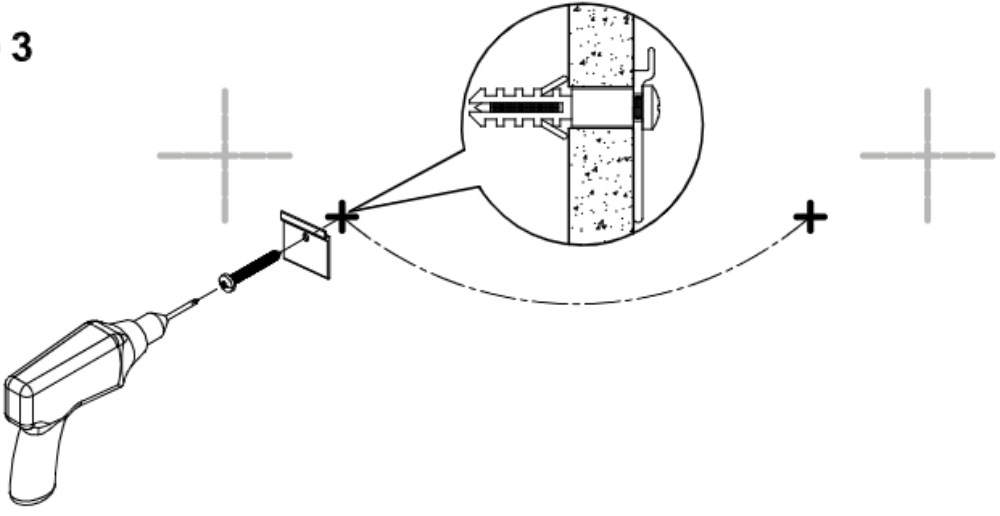
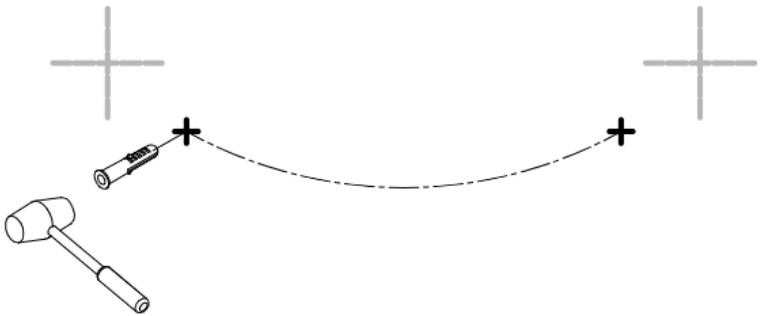
INSTALL MOUNTING BRACKET
Using a drill, make holes and fill with supplied plugs and install mounting bracket. A l’aide d’une perceuse, percer les trous et remplir avec chevilles et installez le support de montage.
STEP 1

STEP 2
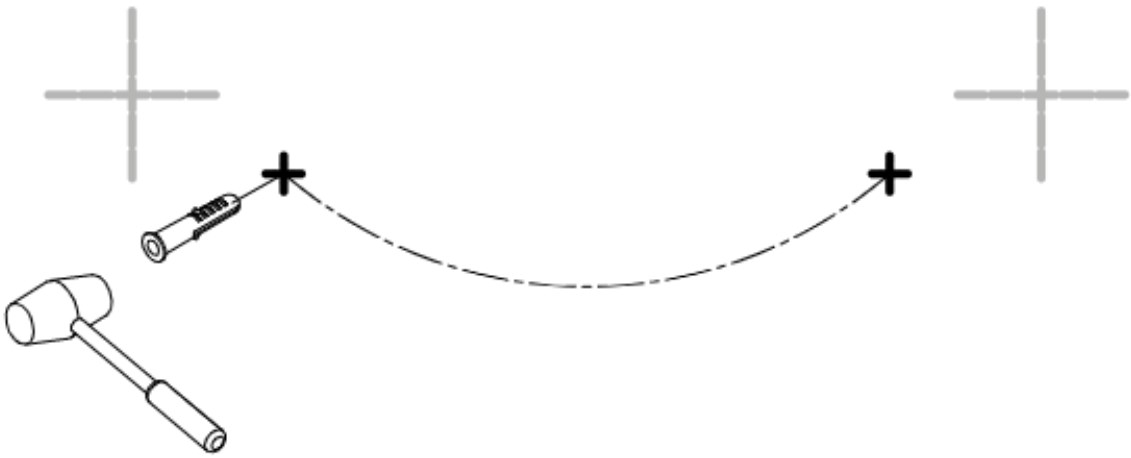
STEP 3
CONNECTING ELECTRICAL WIRING
WARNING

PLEASE NOTE :
The colors referenced in the diagram above is based on conventional standards
and may differ between households. If there is any confusion as to how these
should be connected, please seek the help of a licensed professional
electrician. Electric shock, fire hazard and death are possible consequences
of poor wiring for none of which FOCA will be held liable.
MIRROR INSTALLATION
PLACEMENT
Place the mirror against the wall and slide down as shown in image 2. Placer
le miroir mitre le mur et le faire glisser vers le bas tel qu’illustr6 dans
/’image 2.

MIRROR INSTALLATION
PLACEMENT
Select the desired position of the mirror. Level and mark the location.
Solectionner la position desiree du miroir. Niveler et marquer lemplacement.
MIRROR INSTALLATION
SUPPORT LOCATION
Measure the center of the holes and mark the drilling locations ensure marking
are leveled. Mesurer les centre des trous et marquer les emplacements de
pergage d’assurer le marquage soot niveles..
STEP 1
STEP 2
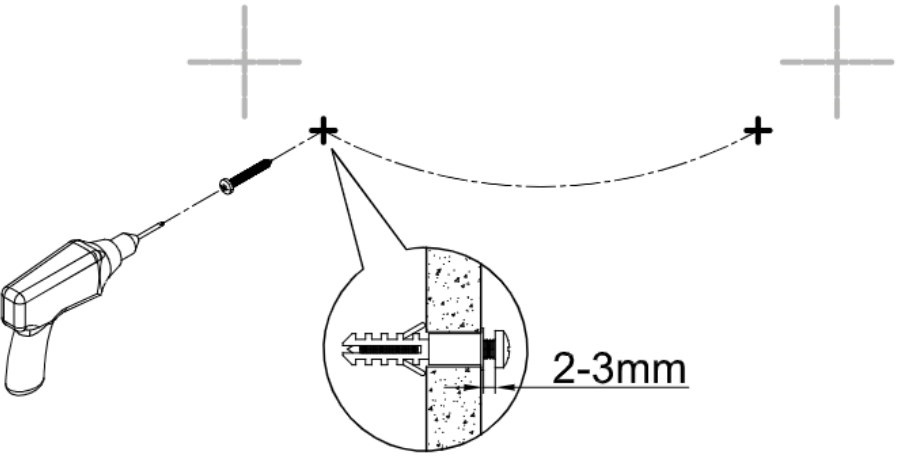
MIRROR INSTALLATION
INSTALL SCREWS
Using a drill, make holes and fill with supplied plugs and screws. Leave a gap
of 2 – 3mm between the head of the screw and the wall. A [aide d’une perceuse,
percer les trous et remplir avec chevilles et vis fournies Laisser un espace
de 2 – 3 mm entre la tate de la vis et le mur.
STEP 1

STEP 2
STEP 3
CONNECTING ELECTRICAL WIRING
WARNING

PLEASE NOTE:
The colors referenced in the diagram above is based on conventional
standards and may differ between households. If there is any confusion as to
how these should be connected, please seek the help of a licensed professional
electrician. Electric shock, fire hazard and death are possible consequences
of poor wiring for none of which FOCA will be held liable.
MIRROR INSTALLATION
PLACEMENT
Place the mirror against the wall and slide down as shown in image 2. Placer
le miroir contre le mur et le faire glisser vers le bas tel qu’illustre dans
l’image 2.
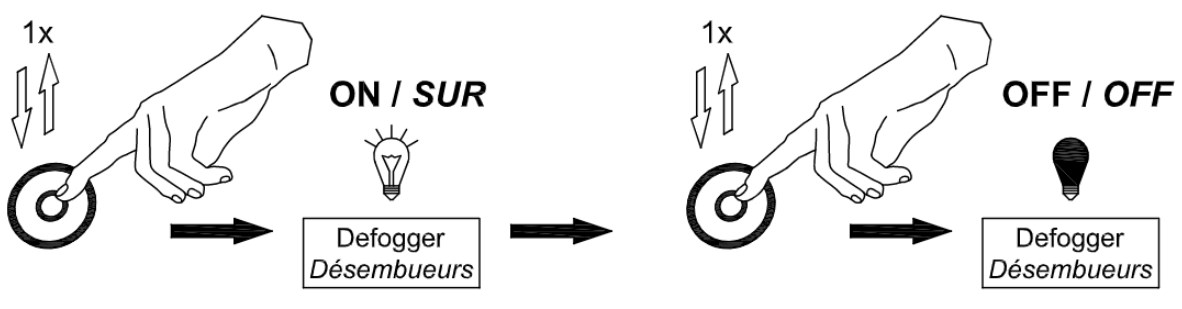
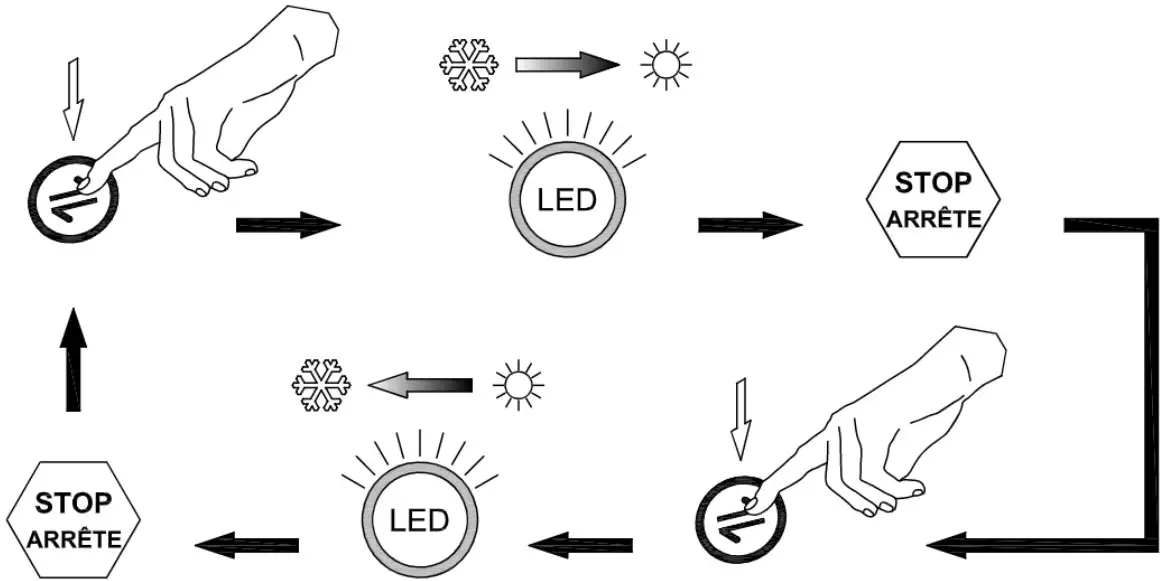
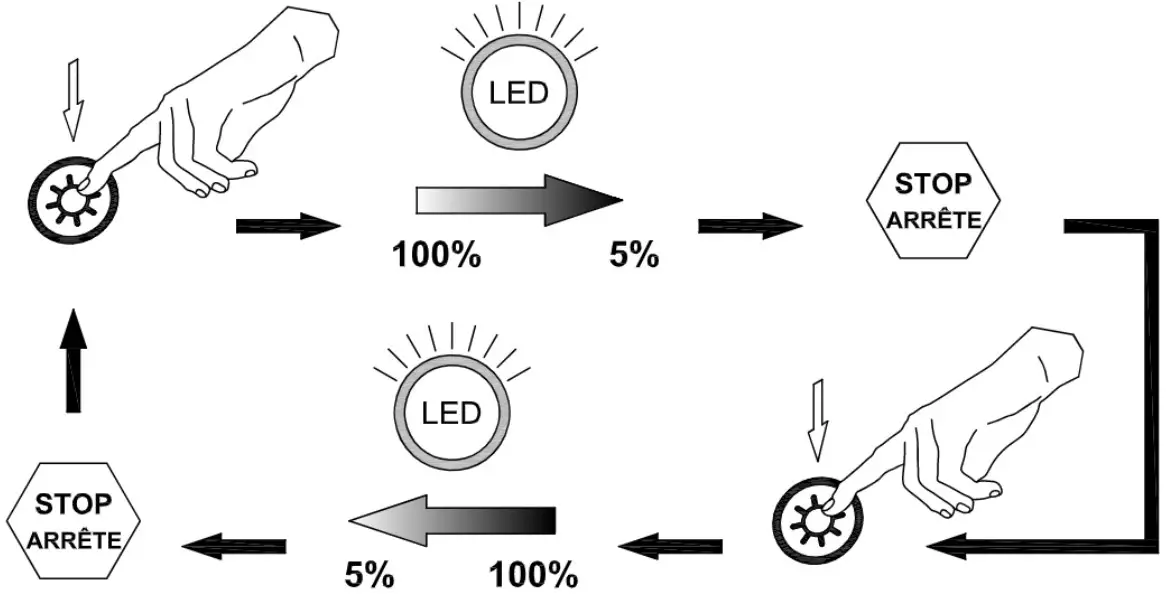
User’s Guide
CAUTION
Touch button will be functional only after 3 seconds of power-up. Le bouton
tactile ne sera fonctionnel qu’apres 3 secondes de mise sous tension.
Short Touch / Bref touché (<1s)
Short Touch / Bref touché (<1s)
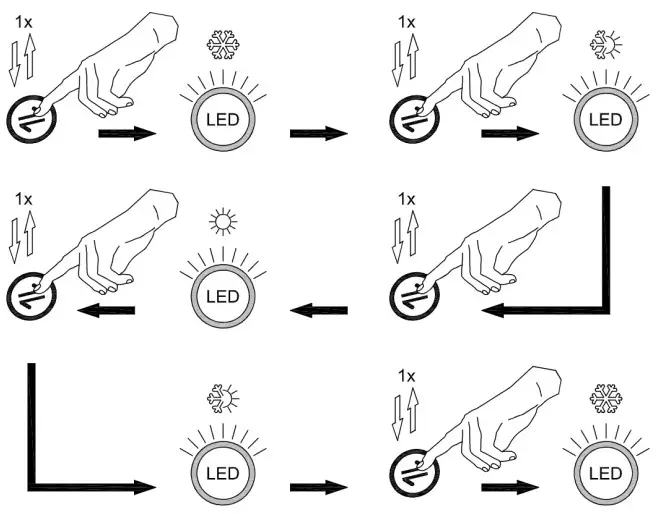
Short Touch / Bref touché (<1s)
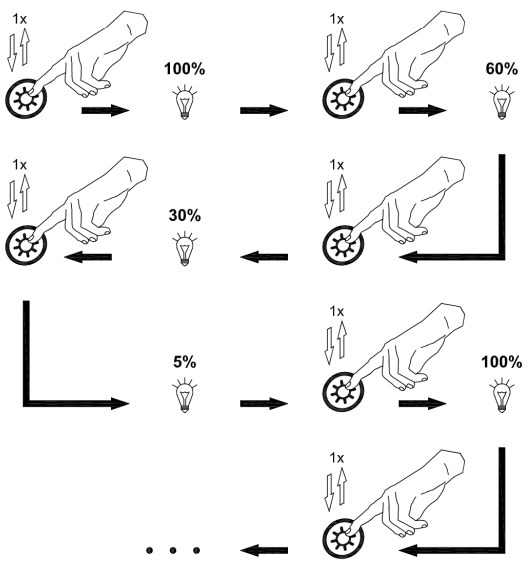
Short Touch / Bref touché (<1s)
Short Touch / Bref touché (<1s)
Read User Manual Online (PDF format)
Read User Manual Online (PDF format) >>