Wolsen G1611 Mini HDMI Console Instruction Manual
- June 5, 2024
- Wolsen
Table of Contents
G1611 Mini HDMI Console
Instruction Manual
PLEASE READ THROUGH THIS INSTRUCTION MANUAL COMPLETELY BEFORE USE. AND KEEP IT WELL FOR FUTURE ASSISTANCE WHENEVER REQUIRED.
PACKAGE CONTENT
- 1 X MINI HDMI CONSOLE
- 2 X WIRELESS CONTROLLERS
- 1 X 1G MICRO-SD CARD
- 1 X USB CABLE
- 1 X MANUAL
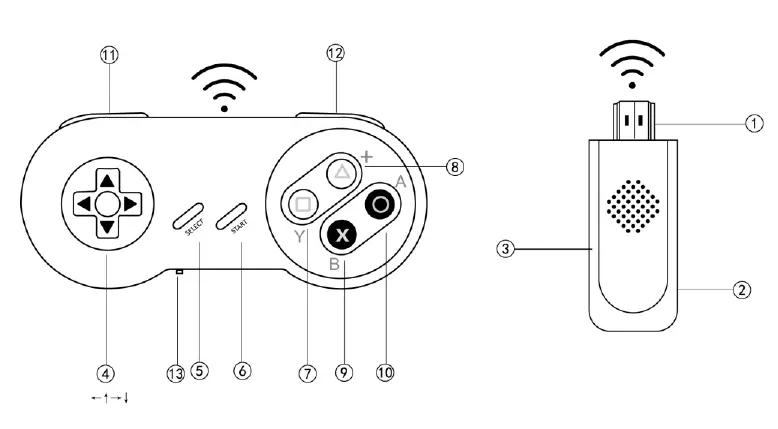
NAME AND FUNCTIONS OF EACH PART AND INSTALLATION
-
1. **HDMI PLUG**Insert to HDMI INPUT of TV set directly.
-
DC-IN (Micro-USB)
Connect to power supply -
MicroSD SLOT
To insert a MicroSD memory card with games. -
DIRECTIONAL JOYSTICK
Move to steer 8 directions as follows:
←、↖、↑、↗、→、↘、↓、↙ -
SELECT(ADD COINS)
Press to select playing mode or to add coins under arcade games. -
START
Press to start game play.
NOTE: Press “SELECT + START” buttons on the controller simultaneously to call out a pop-up menu asking for options such as “SAVE,SETTINGS,EXIT or CONTINUE”. -
Y BUTTON: function may vary under different game.
-
X BUTTON: function may vary under different game.
-
B BUTTON: function may vary under different game.
-
A BUTTON: function may vary under different game.
-
L BUTTON: function may vary under different game.
-
R BUTTON: function may vary under different game.
-
P1 / P2 SWITCH: Toggle to define the controller as P1 or as P2 (NOTE: it’s NOT a ON/OFF power switch)
BATTERY INSTALLATION
- Use a screwdriver to open the battery covers of two wireless controllers.
- Insert AAA batteries for each controller correctly by following the polarity indicated inside the battery compartment.
- Close and screw up the battery cover firmly.
WARNINGS! Please remove the AAA batteries out of the controller if they will not be used for a long period and store them in a cool dry place.
START TO USE
Please follow below steps to start game play.
-
Insert the mini HDMI console directly to HDMI input of TV set. Or connect it to TV via a HDMI extension cable.
-
Connect one end(Micro-USB plug) of USB cable to the mini HDMI console and the other end of USB cable to any 5V electric power source such as USB port on TV set, mobile phone charger, power bank or electrical outlet with USB……etc.
-
Turn on TV set and switch the TV source to be HDMI input. (If the TV has more than one HDMI input, please remember to switch the source corresponding to the HDMI input with mini console connected.)
-
Install batteries of each controller following the BATTERY INSTALLATION guide above.
-
Press any key on the controller to activate as it has auto power sleep function.
-
Scroll the directional joystick on controller P1 to select the desired game and press
“START” or “A” sometimes to enter the game and enjoy your playing. -
Press “ SELECT + START ” buttons on the controller simultaneously to call out a pop-up menu asking for options such as “ SAVE, SETTINGS, EXIT or CONTINUE ”.
WARNINGS & PRECAUTIONS
- Please do NOT disassemble or try to fix the product and its related parts & components at your own discretion.
- Avoid liquid splash over the product and its related parts & components.
- Avoid hitting roughly or dropping the product and its accessories.
- Please do NOT store the product in an area of wetness,dust and dirt.
- Please remove the AAA batteries out of the controller if they will not be used for a long period and store them in a cool dry place.
- Always use the product in a well-ventilated and well-lit area ONLY.
- Use the product in a less signal interference area as the product adopts 2.4G wireless technology and the best distance is below 5 meters recommended.
- Make sure that the controllers have enough battery capacity. Insufficient energy could lead to mal-function or poor connection.
- Please do NOT use the product for a long period continuously. It’s recommended to take a 10-15-minute rest every hour of playing.
- Please keep an appropriate distance from the TV while playing games.
- When feeling drowsy, weak, weary or tired, please IMMEDIATELY stop using the product and take a rest. Or please consult the doctor when your eyes are uncomfortable.
- Keep the product and all other accessories out of reach of children under 6 years to avoid any accident.
- It’s recommended to use the product under supervision or watch of adults.
- Recommended age of use: 6 years up.
ELECTRICAL SPECIFICATIONS:
POWER SUPPLY OF MINI HDMI CONSOLE: 5V, 500 Ma
POWER SUPPLY OF EACH CONTROLLER: 1.5V (AAA BATTERIES OF 1.5V)
FCC Statement
This equipment has been tested and found to comply with the limits for a Class B digital device, pursuant to part 15 of the FCC Rules. These limits are designed to provide reasonable protection against harmful interference in a residential installation. This equipment generates, uses and can radiate radio frequency energy and, if not installed and used in accordance with the instructions, may cause harmful interference to radio communications.
However, there is no guarantee that interference will not occur in a particular installation. If this equipment does cause harmful interference to radio or television reception, which can be determined by turning the equipment off and on, the user is encouraged to try to correct the interference by one or more of the following measures:
- Reorient or relocate the receiving antenna.
- Increase the separation between the equipment and receiver.
- Connect the equipment into an outlet on a circuit different from that to which the receiver is connected.
- Consult the dealer or an experienced radio/TV technician for help.
Caution: Any changes or modifications to this device not explicitly approved by manufacturer could void your authority to operate this equipment.
This device complies with part 15 of the FCC Rules. Operation is subject to the following two conditions: (1) This device may not cause harmful interference, and (2) this device must accept any interference received, including interference that may cause undesired operation.
RF Exposure Information
The device has been evaluated to meet general RF exposure requirement. The
device can be used in portable exposure condition without restriction.
Read User Manual Online (PDF format)
Read User Manual Online (PDF format) >>