TEKTRAMA ShiftMaster PRO Gear Shifting Display Simracing Display User Manual
- June 1, 2024
- TEKTRAMA
Table of Contents
TEKTRAMA ShiftMaster PRO Gear Shifting Display Simracing Display

Product Information
Specifications:
- User Manual Version: 1.0
- Package Contents: 2x M4 16mm bolts, 1x Double Arm Mount, 2x Single Arm Mount
- RGB LEDs: 6 LEDs
Product Usage Instructions
Software Integration
-
SimHub Integration:
Ensure SimHub is properly connected to telemetry in-game by checking the SimHub dashboard tab. -
Connecting the ShiftMaster PRO:
- Open SimHub and go to the Arduino Tab.
- Access the My Hardware subsection within the Arduino Tab.
- Activate the Multiple Arduino option for compatibility.
- Check that all serial ports are enabled for device discovery.
- Connect the ShiftMaster PRO to your computer.
- Upon successful connection, the device should appear as Connected in SimHub.
RGB LEDs Configuration:
- Arrange Arduinos and LEDs correctly (ShiftMaster PRO has 6 RGB LEDs).
- Navigate to RGB LEDs in the Arduino tab.
- Import the provided ShiftMaster PRO LED profile.
- Select the file containing the LED profile and import it.
- Set the start position in the Effect Group folder as the first LED of ShiftMaster PRO.
- Enable/disable LED animation as needed and customize animations carefully.
- Test LEDs using SimHub’s tester for consistency.
Gear Display Configuration:
The gear display system is ready for operation once connected. No
configuration is required. To customize the blinking behavior of the gear
display:
- You can turn off the animation that blinks at the car’s redline by following specific steps (not provided).
Frequently Asked Questions (FAQ)
- Q: What to do if ShiftMaster PRO is not recognized by SimHub?
A: Try connecting the device directly to your computer’s USB port instead of a USB hub to resolve recognition issues.
What’s Included in the Package
- 1x ShiftMaster PRO
- 1x Type-C Cable
- Mounting Hardware:
- 2x M4 16mm bolts
- 1x Double Arm Mount
- 2x Single Arm Mount
Software Integration
SimHub
-
Program Setup
To get your ShiftMaster PRO device working, you need to download the SimHub program onto your computer from the official website. During SimHub installation, you might need to install additional drivers. It’s crucial for smooth operation, so be sure to do so if prompted.
Click here for the official SimHub page.
If you’ve already got it, make sure it’s the latest version. If not, be sure to update it to ensure compatibility. You can check the SimHub version in the bottom left corner.
When in-game, make sure SimHub is properly connected to telemetry by looking at the SimHub “dashboard” tab. -
Connecting the ShiftMaster PRO
Now that you’ve downloaded and correctly Installed SimHub, it’s time to connect the product.
The ShiftMaster Pro is basically plug-and-play, but needs some little things to be able to work properly. -
Begin by opening Simhub and navigating to the “Arduino” Tab.

-
Next, locate and click on the “My Hardware” subsection within the Arduino Tab.

-
Ensure to activate the “Multiple Arduino” option to enable compatibility with your ShiftMaster PRO.

-
Double-check to ensure that all serial ports are enabled for device discovery.
-
Now, proceed to connect your ShiftMaster PRO to your computer.
-
Upon successful connection, the ShiftMaster PRO should automatically appear in the Simhub interface and display as “Connected.”

In case you’re using a USB Hub and encounter recognition issues, try connecting the device directly to your computer’s USB port instead of the hub.
Now your device is correctly connected, a little configuration is required for the LEDs and gear display to make the most of it. -
RGB Leds Configuration
RGB LEDs can prove extremely useful in racing and can be customized in every way possible. To help you get a great experience with ShiftMaster PRO right out of the box, we’ve created an LED profile that already has everything configured for you. -
Please pay close attention to the arrangement of your Arduinos and their respective LEDs, noting that the ShiftMaster PRO features a total of six RGB LEDs (For example, RGB LEDs numbered from 1 to 6).

-
Navigate to “RGB LEDs” in the Arduino tab.

-
Click on “Profile Manager” and then on “Import Profile”.
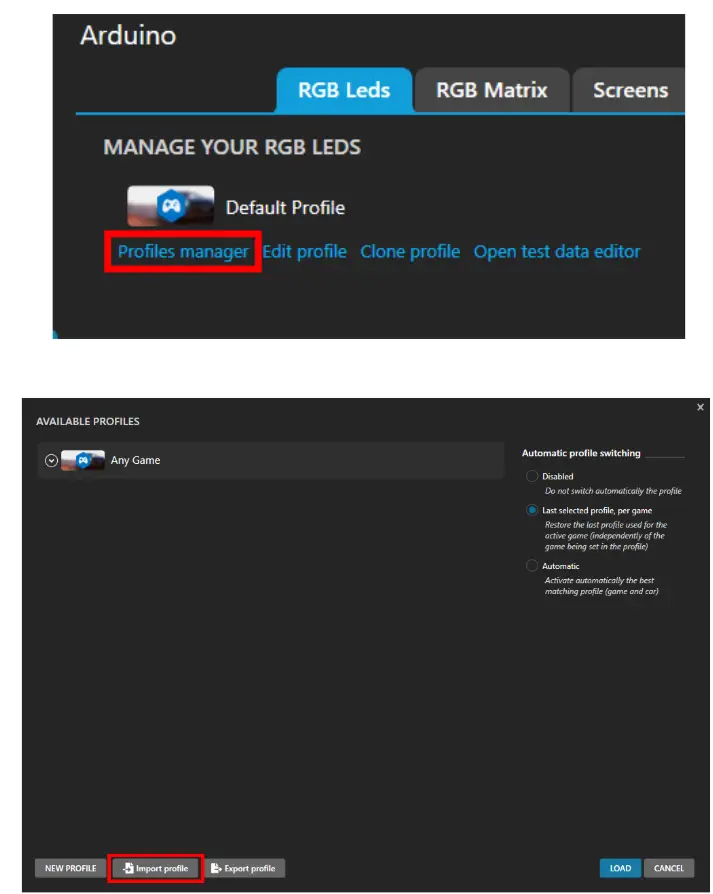
-
Import the provided ShiftMaster PRO LED profile.
  *  **(a)** Select the file provided that contains your LED profile and click “Open”.
  *  **(b)** Your led profile should have been imported
If you have not yet downloaded the Leds Profile, you can download it by clicking HERE.
5. Set the “Start position” in the “Effect Group” folder as the first led of the ShiftMaster PRO in the My Hardware section.
6. Enable/disable led animation as needed.
7. If you want, you can customize Leds animations. Do it with caution as order matters, the bottom ones override the top ones.
8. Test LEDs with SimHub’s tester to ensure consistency, check that what you see on GitHub is the same as in your ShiftMaster PRO. Now your leds are ready!
-
Gear Display Configuration
Once the product has been connected, the gear display system is ready for operation, No configuration is required. You can customize the blinking behaviour of the gear display. By default, the gear display blinks when you reach your car’s redline.
You can turn off this animation to prevent the gear display from blinking by following these steps: -
Begin by opening Simhub and navigating to the “Arduino” Tab.

-
Next, locate and click on the “Display & Alert” subsection within the Arduino Tab.

-
Uncheck the box marked in red.

Now the gear display will stop blinking when you reach the redline.
IMPORTANT NOTE: The gear display turns on automatically when you start
driving your car after starting the game.
Please be aware that the gear display will NOT turn on when using the SimHub
tester or something similar; it will only activate while being actively in-
game.
Contact Us
Thank you for choosing TekTrama!
We hope your new device greatly improves your sim racing experience!
We have tried to put everything important in this user manual and hope that it
has been useful.
Every single product is manually tested before shipping, but if for some
reason you encounter problems installing the product after following the
guidelines, don’t worry! Contact us whenever you want.
Your satisfaction is our top priority and we are here to help you further.
GET IN TOUCH
Instagram Page: Link
Official Community Discord: Invite Link
Email: info@tektrama.com
LEAVE A REVIEW
If you’re enjoying your product, we’d love to hear about it! Your review can
provide valuable feedback for our team. Whether you’ve had a positive
experience or have suggestions for improvement, your honest review is greatly
appreciated!
Leave a review clicking here.
References
- TekTrama
- TekTrama (@tektrama) • Instagram photos and videos
- SimHub, DIY Sim Racing Dash and Hardware – Bring Your Sim Racing Rig To Life
- ShiftMaster PRO – TekTrama
Read User Manual Online (PDF format)
Read User Manual Online (PDF format) >>