FYGAIN B08FZLS7TS Knitting Loom Machine Instructions
- June 1, 2024
- FYGAIN
Table of Contents

FYGAIN B08FZLS7TS Knitting Loom Machine

Knitting Machine Instructions

TIPS BEFORE YOU START
- You must get the tension correct or the machine could drop stitches. If this happens, loosen or tighten the tension. It is important to make a swatch with your chosen yarn to find the best tension. With worsted, try placing the yarn in two holes of the thread holder. With thinner yarns, try all 3 holes (Figure 4 – a).
- Yarn must be loose as you knit. Unwind your yarn and keep a loose puddle on the floor or table so that it never becomes tight as it feeds into the machine.
- Stabilize your machine. According to the Accessories Installation Instructions set the machine’s pillars and suction cups well at first. Then place the unit on a flat table. The machine won’t perform well if it wobbles or moves while you work. You will be holding the top of the machine with one hand to keep the machine steady and cranking with the other. Turn the tension guide toward you. You will need to be able to control the tension of the yarn while you are working.
- Do not turn the crank handle too hard or too fast as this may damage the machine and dropped stitches will be unavoidable.
- If yarn seems “stuck” on a hook, push the stitch or stitches that are on the hook from the bottom of the hook towards the back of the needle.
- You must maintain proper tension on the yarn through the tension piece and be sure that the yarn is fed through the correct notch or notches in the yarn guide. Otherwise, you may drop a stitch.
- Different weights of yarn will require different amounts of tension. If the tension is too taut, try loosening the yarn one by one from the slots on the tension guide.
- Do not be alarmed if the machine makes a little noise when knitting with tighter tension. It may be a little harder to turn the crank. Proceed slowly and evenly.
- Do not forget to set the row counter to zero when you use tube knitting.
CIRCULAR/TUBULAR KNITTING
- STEP 1: TUBES OR PANELS Slide switch on the side of the machine to T (down) for circular or tubes and P (up) for flat panels (figure 1). You can make a hat, purse, etc. by simply cinching in one end of a tube.
- STEP 2: CHOOSE YARN
1. This machine works well with most yarns (such as the yarns within the box). Thinner yarns work equally well but will probably need to be threaded through all 3 tension notches. Eyelash and fur yarns are not particularly good but may work. Heavy or bulky yarns will not work. Be sure and make a swatch.
2. Roll each skein of yarn into a ball (so it unrolls easily) to help the yarn feed smoothly into the machine as you are cranking. If you choose to work directly from a skein, pull out a large amount of yarn every so often to make sure you have enough loose, (2-3 m. at a time or else the machine might skip a stitch. Watch carefully because the yarn cannot become taut when feeding into the machine.- STEP 3: THREAD MACHINE
- [Video: How to start ?]
- STEP 4: SET TENSION
1. Put the yarn through the opening in the yarn guide and pull it down so that it is firmly down into the groove (Figure 2,3).
2. Put the tension arm into the raised position (Figure 3) and thread the yarn through until it comes out the bottom. Remember that you may need to adjust the tension arm depending on the weight of the yarn. Heavier yarns may require less tension (Figure 4).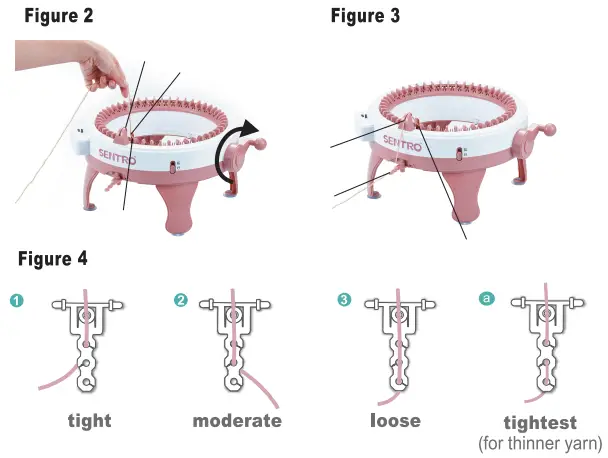- STEP 5: BEGIN KNITTING
1. Thread under the white hook again and begin slowly cranking without skipping any hooks. Wind very slowly, watching carefully to make sure not one hook is skipped for the first 3 or 4 rows. These rows make the foundation and must be done correctly.
2. Hold the top of the machine with your left hand (keep it steady) and crank the handle away from you (clockwise) with your right hand (Figure 2).
3. Keep an eye on your yarn to make sure you always have enough loosened to feed easily into the machine. Periodically pull down gently on the knitted fabric as it comes out of the bottom to prevent the machine from skipping.
4. Untwist the knitting and keep pulling it down carefully as it becomes longer. Once the knitting is longer than the machine, you have to constantly untwist the work and pull down from the center to keep things moving along smoothly.- STEP 6: BIND OFF A TUBE TO REMOVE THE KNITTING FROM THE MACHINE
1. Once your work measures the length you want, stop cranking when the white hook is to the right of the yarn guide. Please note: Yarn should stay on the hook until step 4 of this process.
2. Cut off yarn leaving a 45-60 cm length of yarn (Figure 6). This will be used to bind off your knitting. Slip this piece out of the tension holder and yarn guide and thread onto the plastic sewing needle, then pull the yarn vertically (Figure 5) and crank one row without any yarn.
3. While slowly turning the handle, go through each of the stitches alternating from going through the front of and back of the lowered needle (Figure 7 a,b). You must do this to the right of the yarn holder. All the stitches should now have yarn through them.
4. Turn the handle clockwise and drop all the stitches off the hooks.
5. Your item is finished when all stitches are cast off.
6. For a nicer finished edge, use a circular needle and catch the final row of stitches. Pull out the casting-off thread. Then knit it off as you would a regular knitted piece for a more elastic and more attractive edge.
7. For an open-ended tube (scarfs, leg warmers, etc.), take the threaded sewing needle and stitch back through a few of the last stitches to secure the end of the yarn (Figure 8 b). Make a knot and trim the end of the knot.
8. For a gathered tube (hats, purses, etc.), pull the loose end of yarn tight until it gathers and closes the opening of the tube. Thread the plastic needle and stitch a knot. Once you cinch it closed, you can pull the top into a cute top knot or just close it neatly.CHANGING COLORS OR RUNNING OUT OF YARN – TYING ON NEW PIECE:
- Tie on the new yarn with a square knot and make sure it won’t slip.
- Cut close to the knot and remove the yarn from the tensioner bar (it won’t go smoothly through the holes).
- Hold the yarn taut and crank until the knot is knitted past the tensioner.
- Then thread the yarn back through the yarn tensioner. Keep turning the crank, slowly at first, and continue to knit.
FLAT PANEL KNITTING:
- Slide the mode switch on the front of the machine into the UP position.
- ( Video: How to start”)
- Hint: If stitches are being dropped at the ends of the flat panel, make sure you are turning the crank in each direction until the machine comes to a complete stop.
TO PICK UP A DROPPED STITCH:
- The machine might drop a stitch and unravel down several rows before you notice it. If this happens, the crochet hook can help pick up dropped stitches.
- Turn the crank on the machine to knit up to the last stitch before the dropped stitch. Dropped stitch should be slightly to the side of the yarn guide. This hook should be in the raised position.
- You will see a loop where the dropped stitch starts and above the loop you will have a “ladder” – with rungs corresponding to each dropped stitch – between the stitches.
- Insert the crochet hook from front to back through the loop.
- Hook the first rung of the ladder onto the crochet hook and pull it through the opening of the loose stitch. Then hook the next rung and pull it through and continue this step with each rung until you have carried the stitch back up to the corresponding knitting machine stitch.
- Transfer the loop from the crochet hook onto the knitting machine hook.
Accessories Installation Instructions
- Includes: Machine pillar 4 Suction cup 4 Screw 4 Screwdriver 1
- Insert the pillar into the notch on the bottom of the machine, then tighten the screw.
- Pleace the suction cups into the notch of the machine pillars.

Read User Manual Online (PDF format)
Read User Manual Online (PDF format) >>