TDSI SM007 Gardis Pro Software Installation Guide
- June 1, 2024
- TDSI
Table of Contents
TDSI SM007 Gardis Pro Software

Product Information
The GARDiS Installation Guide SM007 provides detailed instructions for installing the GARDiS software. It includes information on system requirements, installation process, and upgrading procedures.
Specifications
- Date Issued: 10/11/2022
- Change Summary: Updated with upgrade section, Net Framework updated to 4.7.2, SQL Server version updated to 2014 SP2 Express
Product Usage Instructions
-
Introduction
The introduction section provides an overview of the GARDiS software. -
GARDiS Requirements
-
Minimum Requirements: Lists the minimum system requirements for running GARDiS.
-
Recommended Requirements: Provides the recommended system specifications for optimal performance.
-
Tested Operating Systems: Lists the operating systems that have been tested and compatible with GARDiS.
-
Supported Database Engines: Specifies the database engines supported by GARDiS.
-
Supported Browsers: Lists the browsers that are compatible with GARDiS.
-
Installer
The installer section guides users through the installation process of the GARDiS software. -
Firewall Access for Server PC
This section explains how to configure firewall access for the server PC to ensure the proper functioning of GARDiS. -
Accessing Inbound and Outbound Port Rules
Detailed instructions on setting up inbound and outbound port rules for GARDiS. -
Inbound Rules
Instructions on configuring inbound rules for the server PC. -
Outbound Rules
Guidance on setting up outbound rules for the server PC. -
Upgrading GARDiS
This section provides steps to upgrade the GARDiS software to a newer version. -
Uninstall the Previous Version
Instructions on uninstalling the previous version of GARDiS before upgrading.
FAQ
- Q: What should I do if I encounter issues during installation?
A: If you encounter any issues during installation, refer to the troubleshooting section in the installation guide or contact customer support for assistance.
Foreword
Copyright © 2022 TDSi. All rights reserved.
Time and Data Systems International Ltd operate a policy of continuous
improvement and reserves the right to change the specifications, colours or
prices of any of its products without prior notice.
Guarantee
For terms of the guarantee, please contact your supplier.
Trademarks
- Copyright © 2022 Time and Data Systems International Ltd (TDSi). This document or any software supplied with it may not be used for any purpose other than that for which it is supplied, nor shall any part of it be reproduced without the prior written consent of TDSi. Microsoft and Windows are registered trademarks of Microsoft Corporation.
- All other brands and product names are trademarks or registered trademarks of their respective owners.
Cautions and Notes
The following symbols are used in this guide:
- CAUTION! This indicates an important operating instruction that should be followed to avoid any potential damage to hardware or property, loss of data, or personal injury.
- NOTE. This indicates important information to help you make the best use of this product.
Issue
| Date Issued| Change Summary|
Issued By
---|---|---|---
1| 25/10/17| Initial Release| RT
2| 05/11/17| Content and Format Changes| RT
3| 27/02/18| Content Update of the installer and troubleshooting section| RT
4| 28/02/18| Removed all Prerequisites| RT
5| 08/03/18| Added Prerequisites back into TS Section| RT
6| 19/07/18| Added Sections 5.3 and 5.4 in TS| RT
7| 10/10/18| Added HTTPS TS section along with other updates requested by DS|
RT
8| 09/11/18| Updated styling from FM’s proofread| RT
9| 21/03/19| Updated with upgrade section. .Net Framework is updated from
4.6.1 to 4.7.2. SQL Server version is updated from 2014 Express to 2014 SP2
Express.| TBA
10| 02/05/19| Revised branding| FM
11| 23/09/20| Updated pc requirements| TBA
12| 30/07/21| Update GARDiS Requirements to reflect Windows Server 2019 and
SQL Server 2019. Removed
references to Windows 7, 8.1 and Windows Server 2012
| TBA
13| 02/03/22| Update GARDiS Requirements. Update to remove references to
unsupported operating systems.
Updated sections 7.5.1, 7.5.2 and 7.5.3 to collate the Windows features to enable
| TBA
14| 10/11/2022| Updated section 3 to specify where to run setup.exe from.| TBA
15| 28/04/2023| Update the Default SQL Version and test the operating| TBA
| | systems|
---|---|---|---
Introduction
- This manual will show you the installation steps required, depending on the Windows version you’re working on.
- This guide contains walkthroughs for 10, as well as Server 2016 and 2019.
- Before installing GARDiS on your system certain prerequisites need to be enabled first.
- PLEASE NOTE: Windows 10 and Server 2016 need Windows updates enabled.
GARDiS Requirements
The computer name must be 15 characters or less.
-
Minimum Requirements
Intel i7, 8GB RAM, 40GB1 free hard drive space, Windows 10 Pro. -
Recommended Requirements
Intel i7 or above, 16GB RAM, 80GB1 free hard drive space. -
Tested Operating Systems:
GARDiS CAN NOT BE INSTALLED ON A DOMAIN CONTROLLER- Windows 2022 Server Standard x64 – Fully supported
- Windows 2022 Server Datacentre
- Windows 2019 Server Standard x64 – Fully supported
- Windows 2019 Server Datacentre
- Windows 2016 Server Standard x64 – Fully supported
- Windows 2016 Server Datacentre x64 – Fully supported
- Windows 2012 Server Standard x64 – Not supported (R2 SP1)
- Windows 2012 Server Datacentre x64 – Not supported (R2 SP1)
- Windows 2008 Server x86/x64 – Not supported (R2 SP1)
- Windows 10 Pro x86/x64 – Fully supported
- Windows 8.1 Pro x86/x64 – Not supported
- Windows 7 Professional x86/x64 – Not supported
- Windows 7 without Service Pack 1 installed – Not supported
- Windows 7 Home – Not supported
-
Supported Database Engines
GARDiS software will be installed with Microsoft SQL 2022 Express.- SQL 2019 Standard x64
- SQL 2019 Express x64
- SQL 2017 Standard x64
- SQL 2017 Express x64
- SQL 2017 Enterprise x64
- SQL 2016 Express x64
- SQL 2016 Standard x64
- SQL 2016 Enterprise x64
- SQL 2014 Express x86/x64
- SQL 2014 Standard x86/x64
- SQL 2014 Enterprise x86/x64
PLEASE NOTE:
- Windows 7 and 2008 Server – See section 3.1.
- Domain controllers or child domains are not supported by TDSi
The size of the hard disk depends on how many backups and events are to be stored by the system.
Supported Browsers
- Google Chrome
- Mozilla Firefox
- Edge
- Microsoft Internet Explorer 11
- Opera
Installer
- Copy the installer onto C:\. Do not run from the downloads folder or desktop. This may prevent SQL Server from installing correctly.
- Run the ‘Setup.exe’ file.
- An InstallShield pop-up window may appear, prompting you to install any prerequisites required.
- Click ‘Install’.

- Wait while the required software is installed.
- If prompted, click ‘Yes’ to restart your computer.
- The InstallShield window will automatically reappear once your computer has restarted and you’ve logged back in.
- Click ‘Install’ to continue.
- The installer window will now appear. Click ‘Next’.

- Read the User License Agreement then click ‘I accept’.
- To continue, click ‘Next’.

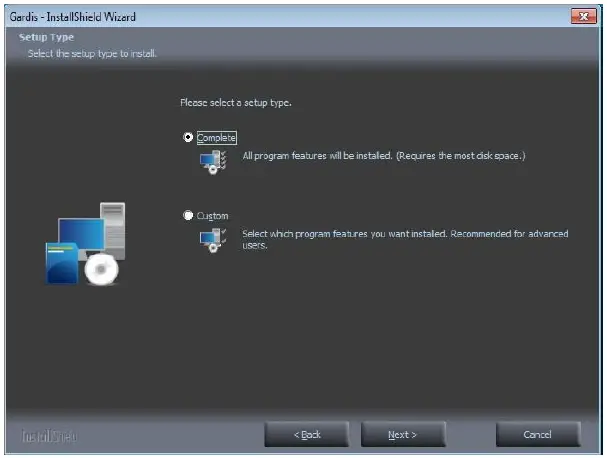
- Click the required setup type. It’s recommended that you select ‘Complete’, but to customise your install, click ‘Custom’.
- To continue, click ‘Next’.
- Click ‘Install’.

- Wait while Windows features are installed.

- You will now see the configuration application appear. Enter the IP address of the PC so you can access the system remotely. Once complete, click ‘Update’ then ‘Finish’.
- If you wish to use/access GARDiS on your PC only, leave the settings as they are and click ‘Finish’ in the bottom right corner.
NOTE:
If you’re accessing GARDiS from a remote PC, you may need to allow these port
numbers in Windows firewall settings as a rule. See Section 4 for information
on how to set up firewall rules.
-
Service URLs: ‘Uniform Resource Locator’ or the address where GARDiS can connect to.
-
Radio buttons: ‘Network’ for connecting from other machines to the GARDiS PC >> drop-down box to choose an IP address from those listed on the PC, it may have two or more network cards, you will need to select which one will be listened to.
-
‘This PC only’ will display the URL that will only work on the PC itself.
-
These radio buttons do NOT change the operation of the GARDiS service, it’s only to indicate to the installer what the desired URL will be following installation.
-
If you do not have one of the internet browsers listed in section 2.5, you will see this message.
-
To complete the installation, click ‘Yes, I want to restart my computer now’ then click ‘Finish’.

-
Navigate to the address you previously set in the configuration application.
- E.g. 192.168.5.17:52773
-
Click ‘Log In’ on the landing screen, then you will now be able to log into GARDiS using your username and password.
- Username: GARDiS
- Password: TDSi$1234
NOTE: The username and password are case sensitive.
-
You will now see the screen below, prompting you to change your password.
-
Fill in the required fields, then click ‘Submit’. You will then be redirected to the landing page once more and asked to re-enter your login details.

Firewall Access for Server PC
Accessing Inbound and Outbound Port Rules
- To access GARDiS on a browser from a remote PC you need to allow the GARDiS ports through the firewall on the Server PC.
- In the start menu, search for ‘Windows Firewall’ and click on it.
- Look to the left-hand panel and click ‘Advanced settings’.
Inbound Rules
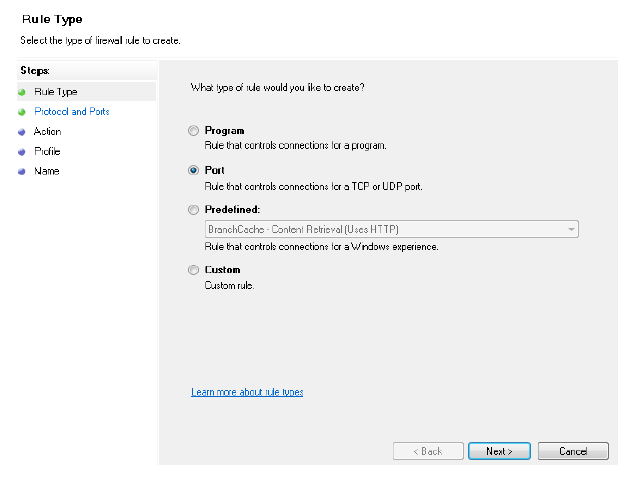
- In the left-hand menu click ‘Inbound Rules’.
- In the right-hand menu click ‘New Rule…’
- Make sure ‘Port’ is selected, then click ‘Next’.

- Make sure TCP is selected, then click the ‘Specific Local Ports’ box and enter:
- 5074
- 52773
- 53198
- NOTE: Each port number must be followed by a comma.
- Then click ‘Next’.

- Make sure you’ve selected ‘Allow the Connection’ then click ‘Next’.
- By default Doman, Private and Public are ticked. Change as required then click ‘Next’.

- Give the new rule a name and enter a description if required, then click ‘Finish’.

Outbound Rules
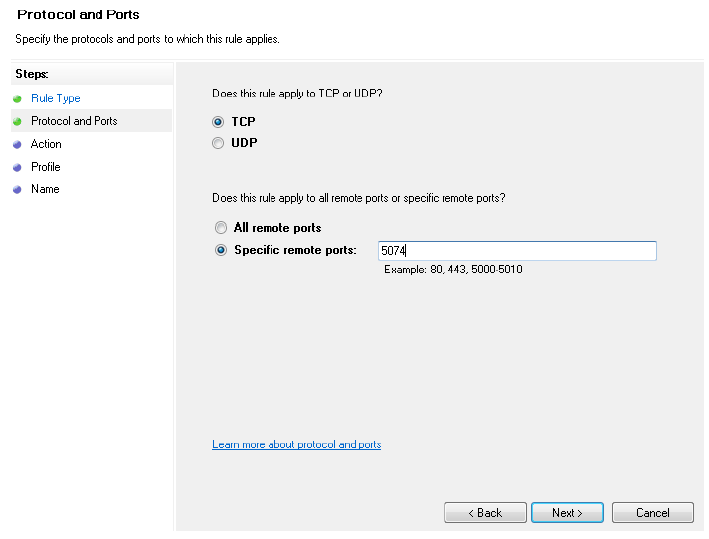
- One of the port numbers also needs to be entered into an Outbound Rule.
- Windows Firewall Advanced Settings should still be open, click ‘Outbound Rules’ in the left menu.
- Click ‘New Rule…’ in the right-hand menu.
- Select ‘Port’ then click ‘Next’.
- Make sure ‘TCP’ is selected, then enter ‘5074’ in the specific remote ports box. Then click ‘Next’.
- Make sure ‘Allow the Connection’ is selected, then click ‘Next’.

- By default Domain, Private and Public are ticked. Change as required then click ‘Next’.

- Name the rule as required then click ‘Finish’.

Upgrading GARDiS
Uninstall the Previous Version
- Go to Control Panel -> Programs and Features. Right-click on GARDiS from the list of programs and select “Uninstall”.
- The software will be removed and the configuration settings will remain.
Install the New Version
- Install the new version by following the steps in section 4 (Installer) from this manual.
- During the Configuration step, the previous settings will be displayed. Confirm and close.
- The installer may ask to reboot the computer. This is recommended for successful software installation.
Troubleshooting
Installing on a Domain Controller
GARDiS cannot be installed on a domain controller. If you attempt to install
on a domain controller you will see this error message.
Error installing .NET 3.5
- If you encounter an error while installing .NET 3.5 during the installation, go to the following web address https://support.microsoft.com/en-gb/help/2734782/net-framework-3-5-installation-error-0x800f0906-0x800f081f-0x800f0907.
- Find your Windows version and error code, then follow the instructions on Microsoft’s website.
Error installing .NET 4.7.2
If you encounter an error as shown below while installing .NET 4.7.2 you will
need to install Windows updates.
SQL Installation Failure
- If you encounter errors while installing SQL during the installation of GARDiS. open the ‘Summary.txt’ log file located here:
- C:\Program Files\Microsoft SQL Server\120\Setup Bootstrap\Log\ Or, depending on what operating system you’re using:
- C:\Program Files (x86)\Microsoft SQL Server\120\Setup Bootstrap\Log\.
Troubleshooting – Windows Features
- If you experience any issues while installing or running GARDiS, Windows may have been unable to automatically enable some of the Windows features. The following steps will show you how to enable all the required features depending on the version of Windows you are using.
- Make sure you check these Windows features.
Windows 10 Windows Features
- Windows features are accessible by clicking ‘Start’ and performing a search through the control panel.
- Click ‘Turn Windows features on or off’.
- Go to Section 7.5.3 for details of the Windows features required by GARDiS.
Windows Server Windows Features
Windows features can be configured on Windows Server 2016 by clicking the
‘Start’ icon and then clicking ‘Server Manager’.
- In the top right corner, click ‘Manage’ then click ‘Add Roles and Features’.
- Click ‘Next’.

- Select the required option then click ‘Next’.

- Click the required server then click ‘Next’.

- Scroll down the list to ‘Web Server (IIS)’ then click to enable it. Then click ‘Next’.

- Select Web Server Role.

- Select Role Services to begin editing the Windows Features. Go to section 7.5.3 for full details of the Windows features to enable.

- Click ‘Next’ and then ‘Install’ to begin installing the Windows features.

- Wait for Windows to install the features, then once complete click ‘Close’.

Window Features to Enable
- Make sure ‘.NET Framework 3.5’ and ‘4.7’ (4.8 depending on Windows OS) are enabled at the top of the list.
- Make sure ‘Internet Information Services’ are enabled, then click the icon to expand and reveal more options.
- Click the icon next to Web Wide Web Services to expand and show more options.
- Click the icon next to Application Development Features to expand then make sure the following settings are enabled:
- .NET Extensibility 4.7/4.8
- ASP
- ASP .NET 4.7/4.8
- ISAPI Extensions
- ISAPI Filters
- Scroll down to Common HTTP Features and click the icon to reveal more options. Then make sure the following settings are enabled:
- Default Document
- Directory Browsing
- HTTP Errors
- Static Content
- Click the icon next to Health and Diagnostics to reveal more settings then make sure the following settings are enabled:
- HTTP Logging
- Request Monitor

- Click the icon next to Performance Features then make sure the following settings are enabled:
- Static Content Compression
- Click the icon next to Security and make sure the following settings are enabled:
- Basic Authentication
- Client Certificate Mapping Authentication
- IIS Client Certificate Mapping Authentication
- IP Security
- Request Filtering
- URL Authorization
- Once complete, click ‘OK’.
Log-in Button Error
Symptom:
Can navigate to the login page, but when you click the ‘Login’ button, the
following screen appears with an IDX10803 error.

Resolution:
Change the ‘Load User Profile’ setting in IIS to ‘True’.
- Open ‘Internet Information Services (IIS) Manager’.
- Find your computer in the connections menu on the left and click the ‘Expand’ arrow.
- Click ‘Application Pools’.
- Left click ‘GardisToken’ then click ‘Advanced Settings’ in the right-hand menu.
- Locate ‘Load User Profile’.
- If it says false, click on it and change it to ‘True’.

- Once complete, open ‘Services’ and find ‘Gardis API’. Right-click it, then click ‘Restart’.

Unable to log in
- The most likely cause of this issue is that the GARDiS services aren’t running.
- Once you’ve restarted your system after the installation, GARDiS should start automatically within 3 minutes.
Open ‘Services’.
Make sure the following services are running.
- Gardis ACU Manager
- Gardis API
- Gardis Credential Manager
- Gardis Event Manager
- Gardis Service Manager
- SQL (GARDiS)

- If the services aren’t running, right-click on it and click ‘Start’.

- Now you’re sure the services are running, browse to http://localhost:52773 or the address you’ve set previously during the installation.
- You will now be able to log into GARDiS using your username and password.
HTTPS
- The default protocol for GARDiS is Http. This is, in most cases, acceptable as all data is being transferred on a local area network. In a medium to large organisation, data protection and securing data will be more active. For this, the protocol needs to be configured to use Https, which encrypts all data between the client (Browser) and the server.
- It is recommended to stop all GARDiS services until all tasks are complete.
Enable the https
First, run the GARDiS configuration tool and select the Https option.

- Change the protocol from ‘Http’ to ‘Https’.
- Https has a default port of 443 and if this is the only website running on this PC (recommended), the website port can be set to this value.

- The ‘Security Token Service’ and ‘API’ can then be changed to any value and as an idea using a 443xx gives an indication they are also on a https. Finally, click the ‘Confirm’ button to save these settings.
- If an error occurs at this point in updating the IIS settings, this can be ignored as changes are required to be set in the IIS.
VPN and WAN
GARDiS will not work internally as the VPN network cannot be accessed on the same WAN.
References
- .NET Framework 3.5 installation errors - Windows Client | Microsoft Learn
- .NET Framework 3.5 installation errors - Windows Client | Microsoft Learn
Read User Manual Online (PDF format)
Read User Manual Online (PDF format) >>