KEYSME Lunar 01 Fully Customizable Mechanical Keyboard User Manual
- June 9, 2024
- KEYSME
Table of Contents
Connect Wired
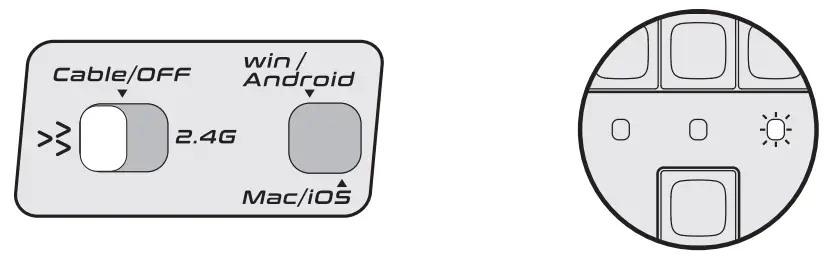
Connect wired device with the cable, then turn the switch to the Cable/OFF mode.
Connect 2.4G Wireless
Connect the dongle to the device.Turn the switch to the 2.46 mode.The
indicator light will start flashing once a second when pairing.The indicator
light will start flashing quickly and the light will stay on when pairing is
successful.
If the pairing cannot be performed or the pairing times out, please repeat the
above steps. Press FN + ∼ (for 3 seconds) until pairing is successful.

Connect Bluetooth
Turn the switch to the “ ” mode. Bluetooth mode can connect up to three devices. Press Fn+1 , Fn+2 and Fn+3 to switch devices. Press FN+1 , FN+2 or FN+3 (for B seconds) and pair with device named KEYSNIE Lunar 01. The indicator light will light up red, green, and blue to correspond to the three channels.The indicator light flashing once a second when pairing.The indicator light flashing quickly and the light will stay on when pairing is successful.
Knob Set
Press the knob once to switch the pickup lamp mode.Turn the pickup lamp on or
off when press for 1 second.

Compatibility Windows/Android
Note: some shortcuts may require system support

win/Android mode shortcuts
FN+F1 Decrease screen brightness
FN+F2 Increase screen brightness
FN+F3 Open the mission control
FN+F4 Open the explorer
FN+F5 Open the calculator
FN+F6 Open the computer window
FN+F7 Previous track
FN+FB Play/Pause
FN+FS Next track
FN+F1O Mute
FN+Fll Decrease volume
FN+F12 Increase volume
FN+↑ Increase backlight brightness
FN+↓ Decrease backlight brightness
FNIA±← Increase backlight speed
FN+→ Decrease backlight speed
FN+DEL Switch backlight mode
FN+END Switch backlight color
FN+W Interchange positions of WA= and ↑↓← →
FN+WIN The WIN key is disabled,the WIN key’s light will turn off
FN+∼ 2.46 Model Press for 3 seconds and pair with 2.46
FN+ 1 ST Channel 1 Press for 3 seconds and pair with 13T Channel 1
FN+2 13T Channel 2 Press for 3 seconds and pair with 13T Channel 2
FN+2 13T Channel 3 Press for B seconds and pair with BT Channel 3
Compatibility Mac/ios

Mac/i0S mode shortcuts
FN+F1 Decrease screen brightness
FN+F2 Increase screen brightness
FN+F3 Open the mission control
FN+F4 Open the Launchpad
FN+F7 Previous track
FN+F8 Play/Pause
FN+F9 Next track
FN+F1O Mute
FN+F11 Decrease volume
FN+F12 Increase volume
FN+↑ Increase backlight brightness
FN+↓ Decrease backlight brightness
FN+← Increase backlight speed
FN+→ Decrease backlight speed
FN+DEL Switch backlight mode
FN+END Switch backlight color
FN+W Interchange positions of WASD and ↑↓← →
FN+∼ 2.46 Model Press for 3 seconds and pair with 2.46
FN+1 ST Channel 1 Press for 3 seconds and pair with 13T Channel 1
FN+2 BT Channel 2 Press for 3 seconds and pair with 13T Channel 2
FN+3 BT Channel 3 Press for 3 seconds and pair with 13T Channel 3
 PHONE / PAD STAND
MODE
PHONE / PAD STAND
MODE
Use the attached crowbar to tilt up the cover plate, body and PCBA on the
pickup lamp to remove it.
Once the pickup lamp has been removed you will then be able to use a tablet or
phone instead.You can also match your favorite building block toys to make
your keyboard unique.
 Warning: Please store the
removed parts carefully,keep parts out of reach of children to prevent any
accidents and choking hazards.
Warning: Please store the
removed parts carefully,keep parts out of reach of children to prevent any
accidents and choking hazards.

Adjust Typing feel
Place a towel on the table, place the keyboard back up on the towel, and
insert the attached crowbar into the reserved quick disassembly kit, pry the
shell in the direction as shown in the figure and remove the bottom case.
As shown in the figure, the bottom case of the keyboard has 14 gasket slotsyou
can use the silicone gasket supplied in the package for replacement, or adjust
the quantity and position of the gasket to obtain the desired elastic feel.
Warning: Please store the removed parts carefully,keep parts out of reach
of children to prevent any accidents and choking hazards.
Battery &Charging
This keyboard contains two lithium batteriesXotal capacity 4000mAh/37V/14.8Wh.
It can be charged when the keyboard is connected to the powered on device with
a cable.Use USB3.0 or SV/2A DC adapter for charging speed up. When using SV/2A
DC adaptecthe keyboard is expected to take 7 hours to be fully charged.
Note: this product supports up to SV charging voltage and 2A charging
current,and it must be charged with a DC power.We are not responsible for any
problems caused by improper charging. Indicator light is breathing during
charging,the indicator light lights on when the battery is not charged.
The indicator light lights Green when high battery.
The indicator light lights Orange when middle battery.
The indicator light lights Red when low battery.
The indicator light lights on Blue after being fully charged.
Travel
NOTE: In some special security inspection occasions (such as airports),
please turn the keyboard to the Cable/OFF mode and do not connect the cable.
It is recommended to carry this manual together to inform relevant security
personnel Please ask the local staff if you can check in or take the keyboard
with you when you fly.
Battery saver
When keyboard connects device with the cable, it won’t enter into battery saver mode. When keyboard connects device with 2.4G wireless or bluetooth, it will enter into battery saver mode :
- When keyboard is inactive for 10 minutes.
- After sleep / shutdown of the device connected to the keyboard.
- Keyboard disconnected from device. You can tap any button to wake the keyboard.
Remap keys and macro Please download software running on windows from
www.keysme.com .
Factory reset
Press and hold Fn + M + K for 3 seconds.
Wireless transmission
It is not recommended that use the keyboard more than 10 meters from the
device.There are metal frame objects between the keyboard and the device,
blocked by walls, or the keyboard is resting on the metal surface, which may
affect the signal effect.
It is recommended to use Cable/OFF mode or 2.4G mode for games.The polling
rate of Cable and 2.46 wireless mode connection is 1000Hz,this may add your
gaming experience.
FCC Warnning:
This equipment has been tested and found to comply with the limits for a Class
B digital device, pursuant to part 15 of the FCC Rules. These limits are
designed to provide reasonable protection againstharmful interference in a
residential installation. This equipment generates, uses and can radiateradio
frequency energy and, if not installed and used in accordance with the
instructions, maycause harmful interference to radio communications. However,
there is no guarantee thatinterference will not occur in a particular
installation. If this equipment does cause harmfulinterference to radio or
television reception, which can be determined by turning the equipmentoff and
on, the user is encouraged to try to correct the interference by one or more
of thefollowing measures:
- Reorient or relocate the receiving antenna.
- Increase the separation between the equipment and receiver.
- Connect the equipment into an outlet on a circuit different from that to which the receiver is connected.
- Consult the dealer or an experienced radio/TV technician for help.
Caution: Any changes or modifications to this device not explicitly
approved by manufacturer could void your authority to operate this equipment.
This device complies with part 15 of the FCC Rules. Operation is subject to
the following two conditions:
(1)This device may not cause harmful interference, and (2) this device must
accept any interference received, including interference that may cause
undesired operation.
This equipment complies with FCC radiation exposure limits set forth for an
uncontrolled environment. This equipment should be installed and operated with
minimum distance 0cm between the radiator and your body.
Read User Manual Online (PDF format)
Read User Manual Online (PDF format) >>