LIGHT N EASY 7688ANB-2 Steam Mop Cleaners 9-in-1 with Detachable Handheld Unit User Guide
- June 5, 2024
- LIGHT N EASY
Table of Contents
![]()
Quick User Guide
| High-temperature Steam for Deep Cleaning
---|---
| Ready to Use in 30 Seconds
| 20 FT Power Cord
Thank you very much for purchasing our new steam mop. Make sure to read the instructions carefully before using. Please keep this guide for easy reference. For customer service call 1-844-798-2632 (8:30 am-5:30 pm Mon: Fri.) if you have any questions.
Safety Instructions
For Household Use Only BASIC SAFETY PRECAUTIONS SHOULD ALWAYS BE FOLLOWED WHEN USING THE STEAM MOP. READ ALL INSTRUCTIONS BEFORE USING.
-
Use the steam mop according to the guidance.
-
Please use the accessories that comply with the manufacturer’s recommendation.
-
Do not use it outdoors.
-
Remember to unplug it from the outlet when the mop is not in use.
-
Close attention is necessary when used by or near the children, pets or plants.
-
Do not use the appliance when the unit itself, cord, or plug is damaged. Return it to the manufacturer or the maintenance department for examination and repair.
-
Do not pull the mop through the power cord, do not clip the cord with the door, what’s more, keep the cord away from the sharp edges, corners or heated surfaces.
-
Grasp the plug not the power cord to unplug the steam mop.
-
To avoid the risk of electric shock:
A. Never immerse the product into water or any other liquid.
B. Never touch the product or plug with a wet hand and use the steam mop without shoes.
C. Never use an extension cord without adequate power capacity.
D. Never disassemble or attempt to repair the appliance on your own, incorrect re-assembly or repair may cause an electric shock or another injury to users when using the product. -
Keep your work area dry.
-
Use the mop only on the flat, horizontal surface, do not use it on walls, counters or windows.
-
More attention should be paid when you use it to clean the stairs.
-
During the usage, never turn the steam mop over and direct the steam towards any people, plants or pets.
-
Do not put any object into the water tank, and never use the mop with the tank cover opened.
-
Never put your hand under the steam mop during or a little time after the usage to avoid scalding.
-
Never use the steam mop without the mop cleaning pad attached.
-
Never put any cleaning agent, oil, or any other chemicals into the water tank, the water is enough. Attention: If you live in a hard water area, it is suggested to use distilled water in the water tank.
-
Please take the cleaning pad off immediately after you unplug the steam mop to let the mop cool down.
-
When cleaning the steam mop, unplug the mop from the socket, and clean it with a dry or damp cloth, do not pour water, alcohol, benzene or paint thinner on the unit.
-
Store the appliance in a cool and dry place in your house.
-
Do not store the mop with a damp/wet microfiber cleaning pad attached, because this will damage your mop.
-
Do not use any unauthorized third-party mop pads. It would lead to curly pads and affect the cleaning effect.
WARNING!
Your steam mop is designed to clean hard floor surfaces that will withstand
high heat. Do not use on unsealed wood or unglazed ceramic floors. On surfaces
that have been treated with wax or some no-wax floors, the sheen may be
removed by the heat and steam action. It is always recommended to test an
isolated area of the surface to be cleaned before proceeding. We also
recommend that you check the use and care instructions from the floor
manufacturer.
The danger of scalding. Please use caution when using the steam mop. The steam emitted is very hot.
What is Included
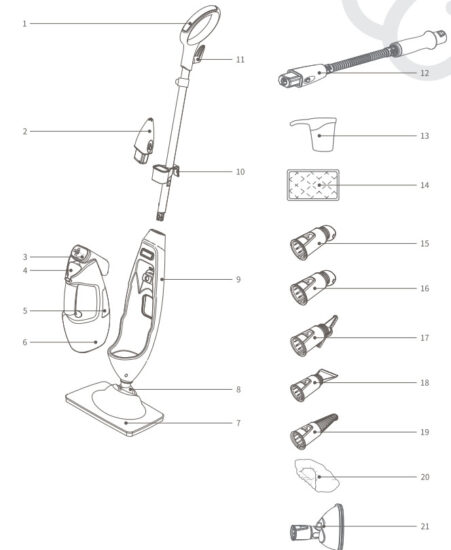
PRODUCT INTRODUCTION
1. Mop handle
2. Pinpoint nozzle
3. Steam control panel
4. Water tank cover
5. Water tank
6. Handheld steamer(removable)
7. Mop head
8. Maneuverable swivel
9. Steam mop main unit
10. Cord wrap(lower)
11. Cord wrap(upper)| 12. Flexible hose
13. Filling cup
14. Cleaning pad
15. Nylon bristle brush
16. Brass bristle brush
17. Grout tool
18. Flat scraper tool
19. Angle concentrator tool
20. Bonnet
21. Flat surface scrubber
---|---
Assembly Instructions
IMPORTANT:
Before filling up the tank, make sure your steam mop is UNPLUGGED from the
socket.

- Insert the mop handle into the steam mop main unit. Fig.1
- Insert the handheld steamer into the steam mop main unit. Fig.2
- Put the steam mop head onto the mop cleaning pad. Fig.3
- Snap the mop head into the mop main unit by lining up the groove on the front of the mop unit with the groove on the back of the mop head. Fig.4
- Open the water tank cover. Please look at the illustration for a visual explanation. Fig.5
- Fill the cup with water and pour it into the tank, just one cup of water is enough for your steam mop. Do not overfill.
- Close the water tank cover.
When assembling your steam mop there may be some water in or around the water tank, because we test all our steam mops 100% before you buy them.
Using Your Steam Mop
-
Plug into a 120-volt electrical outlet. Fig.6 The three lights start blinking for Standby mode. if the lights do not turn on or do not produce steam, reference the troubleshooting section.
-
Press the button Fig.7 to select your steam setting: Default for Standby mode, Once for LOW, Twice for MED, Third for HI, Fourth for LOW, Fifth for MED, Sixth for HI, Seventh for LOW,

-
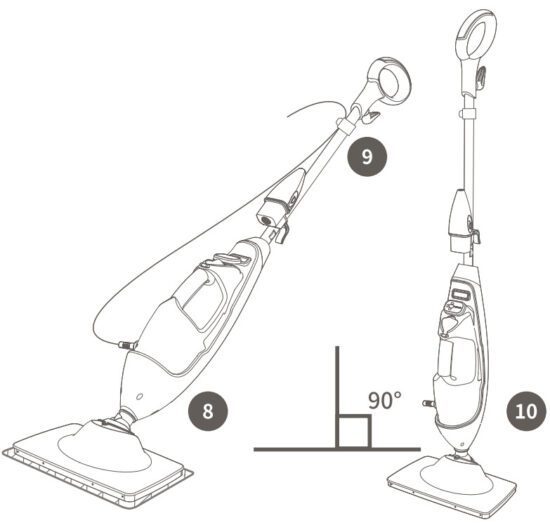
Tilt the handle and start steaming. Fig.8 Clean your floors with a forward and backward motion.
-
We recommend that you snap the cable into the cable clips when mopping the floor. Fig.9
-
Please make the steam mop stand UPRIGHT when you want to stop steaming. Fig.10 It is a brand new design for our product, just the function of the ON/OFF switch.
Using Your Steam Mop
The 7688 Series Steam Mops have three unique steam settings so you can use the perfect amount of steam for the cleaning task at hand. See below for tips on when to use each setting.
| Setting | Ideal for surfaces | Recommended Usage |
|---|---|---|
| LOW | Laminate Bamboo Hardwood Marble | Light cleaning and dusting Loosen and |
lift light dirt Sanitize floors.
MED| Hardwood Marble Tile Stone| Basic, everyday cleaning
Remove spots and smaller messes
Clean moderate and heavily-trafficked areas.
HI| Hardwood Tile Stone Linoleum| Tough cleaning and removal of stuck-on
messes and stains Deep clean heavily-trafficked areas Cut through heavy dirt
and grime Sanitize floors.
HI, the steam mode is not recommended for continuous cleaning on the hardwood
floors.
IMPORTANT:
Make sure you don’t use the mop WITHOUT ATTACHING a microfiber cleaning pad
and adding water to the tank first. When you are using the mop for the first
time, it might take longer than the normal 30 seconds to start steaming. Let
it cool for 2 to 3 minutes before removing pads and storing.
TIPS:
- Your cleaning pad should be replaced every two months to maximize cleaning performance.
- Please slow down the speed of mopping, if the mop cleaning pad get rolled up during usage.
- The tank should be only filled with water, if chemicals or cleaning solution is added in the tank, the mop may get damaged and will be dangerous for use.
Using Handheld Steamer
-
Attach the appropriate accessories according to the cleaning surface.
ACCESSORY 1| ACCESSORY 2| USE
---|---|---
| Clean dirty stuff at corners or tight places.
| | | clean surface stains on showers, countertops, and dish sink.
****| clean around stovetops, sinks, showers, etc.
| remove dirt and grime from the grout.
| steam and scrape off those sticky messes on floors, countertops, etc.
| steam cleans hard-to-reach corners and crevices where dirt and grime build up in the home, like sinks and faucets.
| clean a variety of surfaces such as countertops, walls, mirrors, windows, etc. -
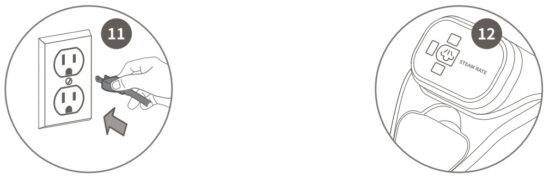
Plug into a 120-volt electrical outlet. Fig.11 The three lights start blinking for Standby mode .
-
Press the button to select your steam setting: Fig.12 Once for LOW, Twice for MED, Third for HI, Fourth for Standby mode, Fifth for LOW, Sixth for MED, Seventh for HI, Eighth for Standby mode,….
-
Always make sure the handheld steamer is in STANDBY MODE or UNPLUGGED when you finish cleaning or when you take a temporary pause.
CAUTION:
The handheld steamer may continue to emit steam for a few seconds when
switching back to standby mode from operating mode. It is normal, and the
steaming will eventually come to a stop.
With PinPoint Nozzle
How to Attach/Detach:
Snap the PinPoint Nozzle Tool into the Handheld Steamer directly and secure
it. Fig.13 To remove, wait for 2 to 3 minutes for the tool to cool, hold the
release button and pull the tool away from the unit.
Usage:
For Dust or Grease -Degrease and eliminate dirt or oil for kitchen equipment,
ovens, fridges, sinks, BBQs, countertops, and more. For Defrost -Defrost
fringe, clean showers, and remove soap and mineral residue.
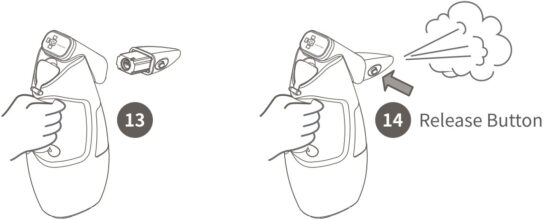 CAUTION:
DO NOT press the release button on top of the pinpoint nozzle to remove the
nozzle immediately after steaming. Avoid touching the tip of the nozzle, as
this will be very hot after steaming. Fig.14
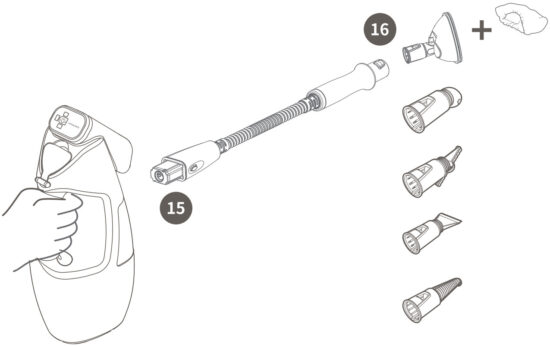
With Flexible Hose and other accessories
How to Attach/Detach: First attach the Flexible Hose to the Handheld Steamer
by snapping the Flexible Hose into the main nozzle. Fig.15
Connect a nylon bristle brush or another accessory to the end of the Flexible
Hose. Fig.16 Slide th base of the tool over the tip of the flexible hose until
the tool clicks securely into place.
To remove, wait for 2 to 3 minutes for the tool to cool, hold the release
button and pull the tool away from the unit.
 Tips: Select the different steam modes to fit different
cleaning needs.
Tips: Select the different steam modes to fit different
cleaning needs.
CAUTION:
Make sure the Handheld Steamer is UNPLUGGED or in STANDBY mode while attaching
or removing the accessory. Avoid touching the accessory, as it will be very
hot after steaming.
DO NOT use the flexible hose without any cleaning tools attached. To
avoid scalding injuries, always UNPLUGGED and allow the Steam Mop to cool
before removing or changing accessories or pads.
Storage
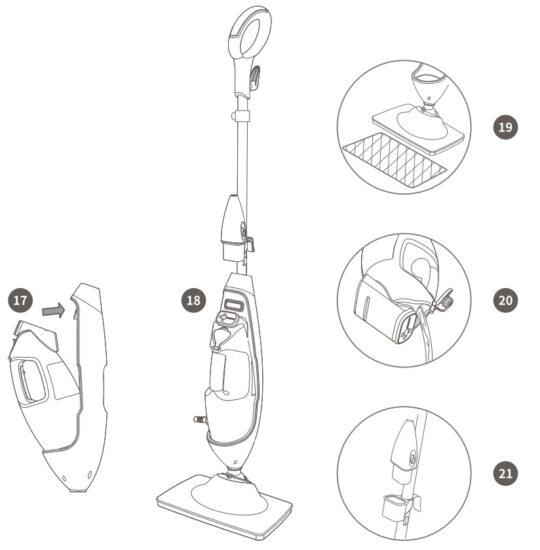
AFTER USING AND STORAGE:
- When you have finished using the handheld steamer, reattach it to the mop by placing the handheld steamer into the mop housing first. Fig.17
- If you have finished mopping, UNPLUG it from the outlet and place the mop into the upright position. Fig.18 Let the unit cool down for 2-3 minutes.
- Remove the cleaning pad. Fig.19
- Empty the water tank before storage. Fig.20
- Place the pinpoint nozzle on the storage clip(with the name of the cord wrap) for next use. Fig.21
NOTE:
Please store it in a cool and dry place indoors.
Troubleshooting Guide
| Problem | Possible Reasons & Solutions |
|---|---|
| Steam Mop could not turn on | 1. Your steam mop should be securely plugged in. |
| Steam Mop could not make steam | 1. Is there water in the water tank? If not, |
add water to your steam mop.
2. If the unit still doesn’t make steam, press the HI, MED, or LOW button to
select the cleaning mode you want. Wait for 30 seconds, and tilt the handle to
activate steam.
3. If used as a handheld steamer, make sure to put your hand on the handle
and press the micromotion switch.
Steam Mop leaves water on the floor| 1. Please check on your microfiber
cleaning pad to whether it is soaked.
2. We recommend you unplug the steam mop and change the microfiber cleaning
pad.
3. Make sure the microfiber cleaning pad is attached correctly.
Floors are cloudy, streaky or spotty after steaming| 1. The microfiber
cleaning pad might be too dirty, please wash the pad clean;
2. If you washed the pad with powder detergent, there might be some residual
detergent left on it. Please wash the pad with clean water.
3. If you are ready to clean your kitchen where there might be some grease on
the floor, please use a degreasing agent or some all-purpose cleaner or dish
soap and some paper towel to clean the floor first.
4. There might be some leftover of the cleaner you used before, and please
clean the floor more times to remove the streaky or spotty.
5. If you live in the hard water area, please use distilled water instead.
Steam Mop is hard to push| 1. Make sure the microfiber cleaning pad is
attached correctly.
2. Please have a check on your pad, and perhaps the pad is excessively dirty.
Replace the pad if it is too dirty or wet.
Model Voltage Frequency Power Water Tank Capacity 7688ANB-2 120V- 60Hz 1550W 11.5oz/340m1
| Model | Voltage | Frequency | Power | Water Tank Capacity |
|---|---|---|---|---|
| 7688ANB-2 | 120V- | 60Hz | 1550W | 11.5oz/340m1 |
TIPS: It is subject to change without notice due to continuing design and quality improvement. For better cleaning performance, please change the mop cleaning pad when necessary.
One(1) Year Limited Warranty
Thank you for your purchase!
WARRANTY:
Enjoy a warranty for the steam mop for one year.
REPLACEMENT POLICY:
Replacements are based on manufacturing defects but not replaced for the
reason of abusing, misusing or another unintended usage of the steam mop. For
the shipping back of the product, the shipping cost is $14.95. Based on the
specific situation of the sample back, we reserve the right for maintenance or
replacement.
MONEY BACK GUARANTEE: Enjoy a 3 months money-back guarantee from the day
you purchase.
EXCELLENT CUSTOMER SERVICE: Need any help? Please feel free to contact
us. Service number:1-844-798-2632
Monday – Friday 8:30 a.m. – 5:30 p.m. Service mailbox:
support@lightneasy.com
Do you like your new steam mop? You can share it with your friends, and please
review the product on Amazon!
Shenzhen And Elephant Technological Development CO., Ltd.
Made in China
Read User Manual Online (PDF format)
Read User Manual Online (PDF format) >>