AIDROIT A4 5 6 Inch LED Disk Lights Flush Mount Ceiling Light Fixtures User Manual
- June 16, 2024
- AIDROIT
Table of Contents
AIDROIT A4 5 6 Inch LED Disk Lights Flush Mount Ceiling Light Fixtures User
Manual

CAUTION:
If the flexible wire or cord of this light is damaged, it should substitute
its Technic service exclusively or a person of equivalents qualification with
the object of avoid any risk”.
PARAMETERS:
Model No.| Rated wattage| Rated voltage| Frequency|
Input current| PF
---|---|---|---|---|---
FD-FD601-xx| 14.8W| 120V| 60Hz| 140mA| 0.9
SUITABLE J-BOX INSTALLATION
| 3-1/2″ and 4″ Octagon Box Steel| 3-1/2″ and 4″ Drawn Round Ceiling
Pan| 3-1/2″and 4″ Plastic box
---|---|---|---
Mounting Hole Distance| 2.75″/3.5″| 2.75″/3.5″| 2.75″/3.5″
Picture|  |
|  |
| 
INSTALLATION
STEP 1.
Disconnect power before servicing. Remove the existing bulb or remove the
existing trim if necessary.
STEP 2.
As shown in figure 1.
Hold the lens down and turn it counterclockwise to remove the lens.

STEP 3.
As shown in figure 2
Connect black and white wire and ground wire with connector respectively.

STEP 4.
As shown in figure 3.
After fully placing the black and white wire and ground wire into the j-box,
lock the lamp on the j-box with two 8#-32 screws.

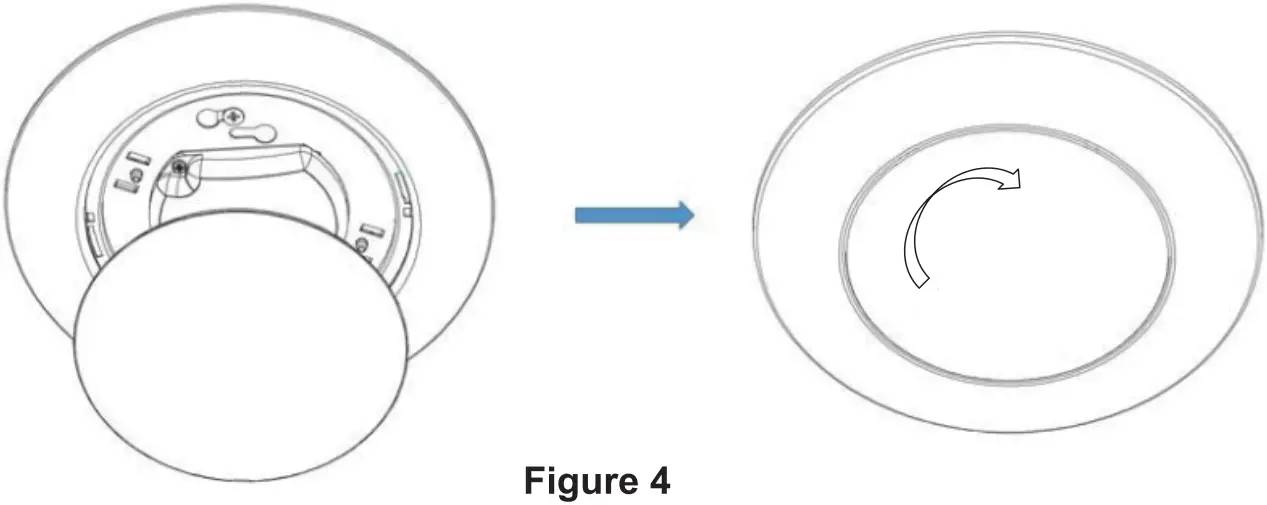
STEP 5.
As shown in figure 4
Rotate the lens into the lamp again (the two buttons on the lens should be
aligned with the two slots on the lamp, and then tighten it clockwise).
STEP 6.
Check to see if the product’s exterior surface is installed on the ceiling so
that there is no gap between them.
STEP 7.
Turn the power switch back on to verify that the product is working properly.
SUITABLE 57/6″ HOUSING INSTALLATION
- Shrapnel install as shown (figure 1 figure 3, figured, figure 6)
- Spring install as shown (figure 2,figure 3,figures figure 6)
STEP 1.
Disconnect power before servicing. Remove the existing bulb or remove the
existing trim if necessary.
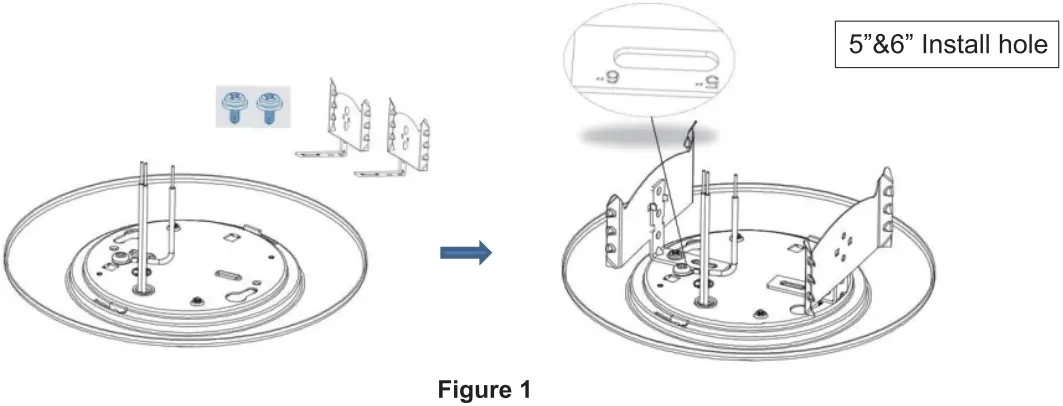
STEP2-A. As shown in figure 1.
Install the lamp body with 2pcs metal shrapnel set.
STEP2-B. As shown in figure 2
Install the lamp body with 2pcs Spring assembly.

STEP 3.
As shown in figure 3
Screw E26 Edison base Lamp holder Fitting or GU24 base Lamp holder Fitting
into existing base socket in housing.

STEP4-A.
As shown in figure 4
Screw E26 Edison base Lamp holder Fitting or GU24 base Lamp holder Fitting nto
existing base socket in housing.

STEP 4-B.
As shown in figure 5
Arranging the ends of spring inside the lamp holder bayonet (as shown in
Figure 4), and then push the LED retrofit kit into the recessed light
fixture until its outer edge is flush against the ceiling surface.

WARNING OF MAINTENANCE:
- Turn off power before Maintenance.
- If the Driver have been secured on ceiling via key holes by screws, please Access above ceiling to unscrew the driver for field inspection of supply connection.


Read User Manual Online (PDF format)
Read User Manual Online (PDF format) >>